Inject your code to a Portable Executable file
��PE��ע�����
By Ashkbiz Danehkar
ԭ�ģ�http://www.codeproject.com/system/inject2exe.asp
���ߣ�arhat
ʱ�䣺2006��4��16��
�ؼ��ʣ�PE ������ ������� OEP SEH �����
Inject your code to a
Portable Executable file
��PE��ע�����
By Ashkbiz
Danehkar
ԭ�ģ�http://www.codeproject.com/system/inject2exe.asp
���ߣ�arhat
ʱ�䣺
�ؼ��ʣ�PE ������ ������� OEP SEH �����
This
article demonstrates five steps to inject your code in a portable executable
(EXE, DLL, OCX,...) file without recompiling source
code.
��ƪ���½������ڲ��ر���Դ���ǰ���£�����ͨ��5���������Ĵ���ע��PE��ʽ���ļ���EXE,
DLL, OCX,...����
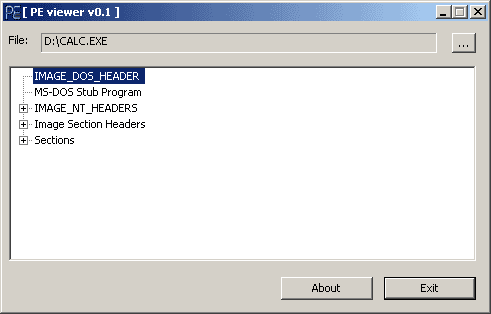
Downloads
- PE Viewer
- PE Maker - Step 1 - Add new Section.
- PE Maker - Step 2 - Travel towards
OEP.
- PE Maker - Step 3 - Support Import
Table.
- PE Maker - Step 4 - Support DLL
and OCX.
- PE Maker - Step 5 - Final work.
- CALC.EXE - test file
Contents
- 0. Preface
- 1. Prerequisite
- 2. Portable Executable file format
- 3. Debugger, Disassembler and some Useful
Tools
- 4. Add new section and Change OEP
- 4.1 Retrieve and Rebuild PE file
- 4.2 Create Data for new Section
- 4.3 Some notes regarding creating a new
PE file
- 4.4 Some notes regarding linking this
VC Project
- 5. Store Important Data and Reach Original
OEP
- 5.1 Restore the first Registers Context
- 5.2 Restore the Original Stack
- 5.3 Approach OEP by Structured Exception
Handling
- 6. Build an Import Table and Reconstruct
the Original Import Table
- 6.1 Construct the Client Import Table
- 6.2 Using other API functions in run-time
- 6.3 Fix up the Original Import Table
- 7. Support DLL and OCX
- 8. Preserve the Thread Local Storage
- 9. Inject your code
- 10. Conclusion
0 Preface
0 ����
It might be, you demand to comprehend the ways a virus program
injects its procedure in to the interior of a portable executable file and
corrupts it, or you are interested in implementing a packer or a protector
for your specific intention to encrypt the data of your portable executable
(PE) file. This article is committed to represent a brief intuition to realize
the performance which is accomplished by EXE tools or some kind of mal-wares.
����������֪�����������Ѳ�����ע��PE������Ⱦ������������Ϊ�˼���PE�е����ݣ����˽�packer��protector��ʵ�֡���ô�����ľ���Ϊ�����ģ����н�����һЩEXE����mal-wares��ʵ�֡�
You can employ the source code of this article to create
your custom EXE builder. It could be used to make an EXE protector in the
right way, or with a wrong intention, to pullulate a virus. However, my
purpose of writing this article has been to gaze on the first application,
so I will not be responsible for the immoral usage of these methods.
�����ʹ�ñ��ĵ�Դ�붨��EXE builder��Ҳ������������EXE protector�������ڲ�����ͼ����ʹ�£�������������������д���ĵ�Ŀ����Ϊ����֪ʶ�������ǽ���˭˭�������ⲡ������ˣ�����Щ����������Щ��������Ϊ���ҸŲ�����
1 �Ⱦ�����
There are no specific mandatory prerequisites to follow
the topics in this article. If you are familiar with debugger and also the
portable file format, I suggest you to drop the sections 2 and 3, the whole
of these sections have been made for people who don��t have any knowledge
regarding the EXE file format and also debuggers.
���ڱ��Ľ��ܵ����⣬û��ǿ���Ե��Ⱦ�������������Ѿ���Ϥ��������PE�ļ��ĸ�ʽ���ҽ�����������2�͵�3���֣�������Ϊ��ѧ�����ġ�
2 Portable Executable file format
2 PE�ļ���ʽ
The Portable Executable file format was defined to provide
the best way for the Windows Operating System to execute code and also to
store the essential data which is needed to run a program, for example constant
data, variable data, import library links, and resource data. It consists
of MS-DOS file information, Windows NT file information, Section Headers,
and Section images, Table 1.
PE�ļ���ʽΪWindows����ϵͳִ�д��롢���������������Ļ������ݣ����磬���������������������Դ���ݵȣ��ṩ����õķ�����������MS-DOS�ļ���Ϣ��Windows NT�ļ���Ϣ������ͷ������ӳ����1��
2.1 MS-DOS����
These data let you remember the first days of developing
the Windows Operating System, the days. We were at the beginning of a way
to achieve a complete Operating System like Windows NT
3.51 (I mean, Win3.1, Win95, Win98 were not perfect OSs).
The MS-DOS data causes that your executable file calls a function inside
MS-DOS and the MS-DOS Stub program lets it display: "This program
can not be run in MS-DOS mode" or "This program can be
run only in Windows mode", or some things like these comments when
you try to run a Windows EXE file inside MS-DOS 6.0, where
there is no footstep of Windows. Thus, this data is reserved for the code
to indicate these comments in the MS-DOS operating
system. The most interesting part of the MS-DOS data is
"MZ"! Can you believe, it refers
to the name of "Mark Zbikowski", one of the first Microsoft programmers?
��Щ���������������˿���Windows����ϵͳ֮������Щ���ӡ���һ��ʼ�����������Windows NT
3.51���ҵ���˼�ǣ�Win3.1�� Win95��Win98���������������ϵIJ���ϵͳ������������ϵͳ��������MS-DOS 6.0������Windows EXE�ļ�ʱ��EXE�ļ�������MS-DOS���ݵ���MS-DOS�ڲ�������MS-DOS Stub program����ʾ"This program can not be run in MS-DOS
mode"��"This program can be run only in Windows
mode"֮���ע����Ϣ����ˣ�MS-DOS ����ϵͳ��Ϊ����ʾ��Щע�Ͷ�������Щ���ݵġ�MS-DOS������������˼�IJ����ǡ�MZ��������ܻ��룬�������ԡ�Mark Zbikowski���D�D���ĵ�һ������Ա��
To me, only the offset of the PE signature in the MS-DOS data is
important, so I can use it to find the position of the Windows NT
data. I just recommend you to take a look at Table 1,
then observe the structure of IMAGE_DOS_HEADER
in the <winnt.h> header in the <Microsoft Visual Studio
.net path>\VC7\PlatformSDK\include\ folder or the <Microsoft
Visual Studio 6.0 path>\VC98\include\ folder. I do not know why the
Microsoft team has forgotten to provide some comment about this structure
in the MSDN library!
������˵����MS-DOS�����У�ֻ��PE������ƫ�����Ƚ���Ҫ��ͨ�����ҿ����ҵ�Windows NT���ݵ�λ�á��ҽ�������ϸ�鿴��1��Ȼ���о�<winnt.h>ͷ�ļ���λ��<Microsoft Visual Studio .net path>\VC7\PlatformSDK\include\��<Microsoft Visual
Studio 6.0 path>\VC98\include\Ŀ¼�У��е�IMAGE_DOS_HEADER�ṹ���Ҳ�֪�����Ŀ����Ŷ�Ϊʲô��������MSDN library���ṩ����ṹ��ע�ͣ�
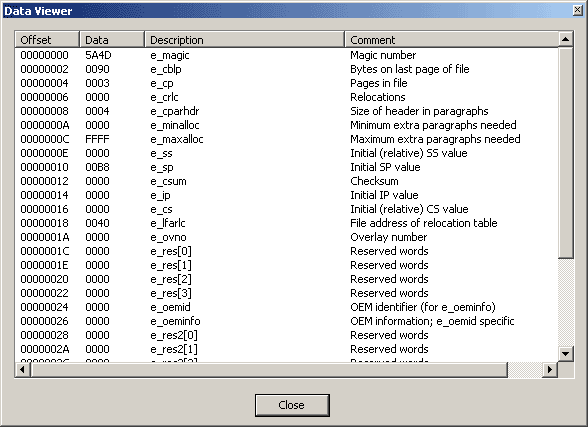
typedef struct _IMAGE_DOS_HEADER { // DOS .EXE header "MZ"
WORD e_magic;
// Magic number
WORD e_cblp;
// Bytes on last page of file
WORD e_cp; //
Pages in file
WORD e_crlc;
// Relocations
WORD e_cparhdr;
// Size of header in paragraphs
WORD e_minalloc;
// Minimum extra paragraphs needed
WORD e_maxalloc;
// Maximum extra paragraphs needed
WORD e_ss;
// Initial (relative) SS value
WORD e_sp;
// Initial SP value
WORD e_csum;
// Checksum
WORD e_ip;
// Initial IP value
WORD e_cs;
// Initial (relative) CS value
WORD e_lfarlc;
// File address of relocation table
WORD e_ovno;
// Overlay number
WORD e_res[4];
// Reserved words
WORD e_oemid;
// OEM identifier (for e_oeminfo)
WORD e_oeminfo;
// OEM information; e_oemid specific
WORD e_res2[10];
// Reserved words
LONG e_lfanew;
// File address of the new exe header
}
IMAGE_DOS_HEADER, *PIMAGE_DOS_HEADER;
e_lfanew is the offset which refers to the position of the Windows NT data. I have
provided a program to obtain the header information from an EXE file and
to display it to you. To use the program, just try:
e_lfanew������Windows
NT����λ�õ�ƫ���������ṩ��һ�����������Դ�EXE�ļ��õ�ͷ��Ϣ����������ʾ������Ҫ�����������ֻ�����룺
This sample is useful for the whole of this article.
�����������ƪ�����ж����õ���
Table 1 - Portable Executable file
format structure
| MS-DOS |
IMAGE_DOS_ |
DOS EXE Signature |
00000000 ASCII "MZ" 00000002 DW 0090 00000004 DW 0003 00000006 DW 0000 00000008 DW 0004 0000000E DW 0000 00000010 DW 00B8 00000012 DW 0000 00000014 DW 0000 00000016 DW 0000 00000018 DW 0040 �� �� 0000003B DB 00 |
| DOS_PartPag |
|||
| DOS_PageCnt |
|||
| DOS_ReloCnt |
|||
| DOS_HdrSize |
|||
| DOS_MinMem |
|||
| DOS_MaxMem |
|||
| DOS_ReloSS |
|||
| DOS_ExeSP |
|||
| DOS_ChkSum |
|||
| DOS_ExeIPP |
|||
| DOS_ReloCS |
|||
| DOS_TablOff |
|||
| DOS_Overlay |
|||
| �� |
|||
| Offset to PE signature |
|||
| MS-DOS Stub |
00000040 00000060 t be run in DOS mode....$....... |
||
| Windows NT IMAGE_ |
Signature |
PE signature (PE) |
|
| IMAGE_ |
Machine |
000000FC DD 00000000 00000100 DD 00000000 00000104 DW 00E0 00000106 DW |
|
| NumberOfSections |
|||
| TimeDateStamp |
|||
| PointerToSymbolTable |
|||
| NumberOfSymbols |
|||
| SizeOfOptionalHeader |
|||
| Characteristics |
|||
| IMAGE_ |
MagicNumber |
00000108 DW 010B 0000010B DB 00 00000110 DD 00000114 DD 00000000 00000118 DD 00012475 00000120 DD 00014000 00000124 DD 01000000 00000128 DD 00001000 00000130 DW 0005 00000132 DW 0001 00000134 DW 0005 00000136 DW 0001 00000138 DW 0004 00000140 DD 00000144 DD 00000400 00000148 DD 0001D7FC 0000014E DW 8000 00000150 DD 00040000 00000154 DD 00001000 00000158 DD 00100000 00000160 DD 00000000 00000164 DD 00000010 |
|
| MajorLinkerVersion |
|||
| MinorLinkerVersion |
|||
| SizeOfCode |
|||
| SizeOfInitializedData |
|||
| SizeOfUninitializedData |
|||
| AddressOfEntryPoint |
|||
| BaseOfCode |
|||
| BaseOfData |
|||
| ImageBase |
|||
| SectionAlignment |
|||
| FileAlignment |
|||
| MajorOSVersion |
|||
| MinorOSVersion |
|||
| MajorImageVersion |
|||
| MinorImageVersion |
|||
| MajorSubsystemVersion |
|||
| MinorSubsystemVersion |
|||
| Reserved |
|||
| SizeOfImage |
|||
| SizeOfHeaders |
|||
| CheckSum |
|||
| Subsystem |
|||
| DLLCharacteristics |
|||
| SizeOfStackReserve |
|||
| SizeOfStackCommit |
|||
| SizeOfHeapReserve |
|||
| SizeOfHeapCommit |
|||
| LoaderFlags |
|||
| NumberOfRvaAndSizes |
|||
| IMAGE_ |
Export Table |
||
| Import Table |
|||
| Resource Table |
|||
| Exception Table |
|||
| Certificate File |
|||
| Relocation Table |
|||
| Debug Data |
|||
| Architecture Data |
|||
| Global Ptr |
|||
| TLS Table |
|||
| Load Config Table |
|||
| Bound Import Table |
|||
| Import Address Table |
|||
| Delay Import Descriptor |
|||
| COM+ Runtime Header |
|||
| Reserved |
|||
| Sections |
IMAGE_ |
Name[8] |
000001E8 ASCII".text" 000001FC DD 00000400 00000200 DD 00000000 00000204 DD 00000000 00000208 DW 0000 CODE|EXECUTE|READ |
| VirtualSize |
|||
| VirtualAddress |
|||
| SizeOfRawData |
|||
| PointerToRawData |
|||
| PointerToRelocations |
|||
| PointerToLineNumbers |
|||
| NumberOfRelocations |
|||
| NumberOfLineNumbers |
|||
| Characteristics |
|||
| �� |
00000210 ASCII".data"; SECTION 00000218 DD 00000220 DD 00000224 DD 00000228 DD 00000000 ; PointerToRelocations =
0x0 00000230 DW 0000 ; NumberOfRelocations
= 0x0 00000232 DW 0000 ; NumberOfLineNumbers
= 0x0 00000234 DD C0000040 ; Characteristics =
INITIALIZED_DATA|READ|WRITE 00000238 ASCII".rsrc"; SECTION 00000240 DD 00008960 ; VirtualSize = 0x8960 00000244 DD 00016000 ; VirtualAddress = 0x16000 00000248 DD 00000250 DD 00000000 ; PointerToRelocations =
0x0 00000254 DD 00000000 ; PointerToLineNumbers =
0x0 00000258 DW 0000 ; NumberOfRelocations
= 0x0
INITIALIZED_DATA|READ |
||
| SECTION[0] |
00000400 EA 22 DD 77 D7 23 DD 77 ��"Ýw��#Ýw 00000408 00000410 2E 1E C7 77 83 1D C7 77 .‑ÇwƒÇw 00000418 FF 1E C7 77 00 00 00 00 ÿ‑Çw.... 00000420 93 00000428 FD A5 E7 77 AD A9 E9 77 ý¥çw©��w 00000438 41 E3 E6 77 60 8D E7 77 Aãæw`çw 00000440 E6 1B E6 77 2B 00000448 00000450 14 1B E7 �� |
||
| �� |
�� 0001BF00 63 00 2E 00 63 00 68 0001BF08 6D 00 0001BF10 0001BF18 61 00 74 00 0001BF20 11 00 4E 00 0001BF28 20 00 45 00 6E 00 0001BF30 75 00 67 00 68 00 20 00 u.g.h. . 0001BF38 4D 00 65 00 6D 00 0001BF40 72 00 79 00 00 00 00 00 r.y..... 0001BF48 00 00 00 00 00 00 00 00 ........ 0001BF50 00 00 00 00 00 00 00 00 ........ 0001BF58 00 00 00 00 00 00 00 00 ........ 0001BF60 00 00 00 00 00 00 00 00 ........ 0001BF68 00 00 00 00 00 00 00 00 ........ 0001BF70 00 00 00 00 00 00 00 00 ........ 0001BF78 00 00 00 00 00 00 00 00 ........ |
||
2.2 Windows NT����
As mentioned in the preceding section, e_lfanew
storage in the MS-DOS data structure refers to the location of the Windows
NT information. Hence, if you assume that the pMem pointer relates the
start point of the memory space for a selected portable executable file,
you can retrieve the MS-DOS header and also the Windows NT headers by the
following lines, which you also can perceive in the PE
viewer sample (pelib.cpp, PEStructure::OpenFileName()):
ǰ���ᵽ��e_lfanew������MS-DOS���ݽṹ�����Windows NT��Ϣ��λ�á���ˣ���������pMemָ���뱻ѡ��PE�ļ����ڴ�ռ���ʼ���й����������ͨ������Ĵ����һ�MS-DOSͷ��Windows NTͷ����Ҳ������PE
viewer������۲���Щ���ݣ�pelib.cpp, PEStructure::OpenFileName()����
IMAGE_DOS_HEADER image_dos_header;
IMAGE_NT_HEADERS image_nt_headers;
PCHAR pMem;
��
memcpy(&image_dos_header, pMem,
sizeof(IMAGE_DOS_HEADER));
memcpy(&image_nt_headers,
pMem+image_dos_header.e_lfanew,
sizeof(IMAGE_NT_HEADERS));
It seems to be very simple, the retrieval of the headers
information. I recommend inspecting the MSDN library regarding the IMAGE_NT_HEADERS structure definition. It makes comprehensible
to grasp what the image NT header maintains to execute a code inside the
Windows NT OS. Now, you are conversant with the Windows NT structure, it
consists of the "PE" Signature, the File Header, and the Optional Header. Do not forget to take a glimpse at their
comments in the MSDN
Library and besides in Table 1.
�һ�ͷ��Ϣ�ƺ��ܼ��㽨����鿴MSDN library����IMAGE_NT_HEADERS�ṹ������ص����ݡ���ͨ�����ؽ�������Windows NT����ϵͳ�У�NTͷ��ʲôӳ����ά��ִ�д��롣���ڣ���Ӧ�ö�Windows NT�ṹ�Ƚ���Ϥ�ˣ���������PE��������File Header����Optional Header�����˱�1�������⣬��Ҫ���˲鿴MSDN Library���й����ǵ�ע�͡�
One the whole, I consider merely, on the most circumstances,
the following cells of the IMAGE_NT_HEADERS structure:
ͨ����˵����ֻ����IMAGE_NT_HEADERS�ṹ������Ҫ��һЩ��Ԫ���磺
FileHeader->NumberOfSections
OptionalHeader->AddressOfEntryPoint
OptionalHeader->ImageBase
OptionalHeader->SectionAlignment
OptionalHeader->FileAlignment
OptionalHeader->SizeOfImage
OptionalHeader->
DataDirectory[IMAGE_DIRECTORY_ENTRY_IMPORT]->VirtualAddress
OptionalHeader->DataDirectory[IMAGE_DIRECTORY_ENTRY_IMPORT]->Size
You can observe clearly, the main purpose of these values,
and their role when the internal virtual memory space allocated for an EXE
file by the Windows OS is fully allocated, if you pay attention to their
explanations in MSDN
library, so I am not going to repeat the MSDN annotations here.
������о���MSDN library�й������ǵĽ��ͣ���ô��Windows NTΪEXE�ļ����������ڴ�ռ�ʱ����Ӧ�ÿ�����������������Щֵ����Ҫ��;���Լ����������ݵĽ�ɫ�����ԣ��Ҳ����������ظ�MSDN���ע�͡�
I should mention a brief comment regarding the PE data directories,
or OptionalHeader-> DataDirectory[],
as I think there are a few aspects of interest concerning them. When you
come to survey the Optional header through the Windows NT information, you
will find that there are 16 directories at the end of the Optional
Header, where you can find the consecutive directories, including their
Relative Virtual Address and Size. I just mention here, the notes from <winnt.h>
to clarify these information:
�Ҵ�Ž���һ��PE����Ŀ¼����OptionalHeader-> DataDirectory[]����Ϊ����Ϊ������һЩ��Ȥ�ķ��档����ͨ��Windows NT��Ϣ����Optional headerʱ���ᷢ��Optional header��β��16��Ŀ¼����ЩĿ¼�������ģ��������ǵ�RVA�ʹ�С������һ�£�<winnt.h>���ע�ͽ�������Щ��Ϣ��
#define IMAGE_DIRECTORY_ENTRY_EXPORT
0 // Export Directory
#define IMAGE_DIRECTORY_ENTRY_IMPORT
1 // Import Directory
#define IMAGE_DIRECTORY_ENTRY_RESOURCE 2
// Resource Directory
#define IMAGE_DIRECTORY_ENTRY_EXCEPTION 3 // Exception Directory
#define IMAGE_DIRECTORY_ENTRY_SECURITY 4
// Security Directory
#define IMAGE_DIRECTORY_ENTRY_BASERELOC 5 // Base Relocation Table
#define IMAGE_DIRECTORY_ENTRY_DEBUG
6 // Debug Directory
#define IMAGE_DIRECTORY_ENTRY_ARCHITECTURE 7 // Architecture Specific Data
#define IMAGE_DIRECTORY_ENTRY_GLOBALPTR 8 // RVA of GP
#define IMAGE_DIRECTORY_ENTRY_TLS
9 // TLS Directory
#define IMAGE_DIRECTORY_ENTRY_LOAD_CONFIG 10 // Load Configuration Directory
#define IMAGE_DIRECTORY_ENTRY_BOUND_IMPORT
11 // Bound Import
Directory in headers
#define IMAGE_DIRECTORY_ENTRY_IAT
12 // Import Address
Table
#define IMAGE_DIRECTORY_ENTRY_DELAY_IMPORT
13 // Delay Load
Import Descriptors
#define IMAGE_DIRECTORY_ENTRY_COM_DESCRIPTOR
14 // COM Runtime descriptor
The last one (15) was reserved for use in future; I have
not yet seen any purpose to use it even in PE64.
���һ����15�������ڽ���ʹ�ã�Ȼ�����һ�û�м��������ں���Ŀ�ģ�������PE64�
For instance, if you desire to perceive the relative virtual
address (RVA) and the size of the resource data, it is enough to retrieve
them by:
���磬����鿴��Դ���ݵ�RVA�ʹ�С��ͨ������Ĵ���Ϳ����ҵ����ǣ�
DWORD dwRVA = image_nt_headers.OptionalHeader->
DataDirectory[IMAGE_DIRECTORY_ENTRY_RESOURCE]->VirtualAddress;
DWORD dwSize = image_nt_headers.OptionalHeader->
DataDirectory[IMAGE_DIRECTORY_ENTRY_RESOURCE]->Size;
To comprehend more regarding the significance of data directories,
I forward you to section
Ϊ�˳����������Ŀ¼���ҽ��������Ķ����ṩ��Microsoft Portable Executable and the Common Object File Format
Specification�ĵ���
2.3 The Section Headers
and Sections
2.3 ����ͷ������
We currently observe how the portable executable files declare
the location and the size of a section on a disk storage file and inside
the virtual memory space allocated for the program with IMAGE_NT_HEADERS-> OptionalHeader->SizeOfImage by the Windows
task manager, as well the characteristics to demonstrate the type of the
section. To understand better the Section header as my previous declaration,
I suggest having a short gape on the IMAGE_SECTION_HEADER structure definition in the MSDN
library. For an EXE packer developer, VirtualSize, VirtualAddress, SizeOfRawData, PointerToRawData, and Characteristics cells have significant rules. While developing
an EXE packer, you should be clever enough to play with them. There are
somethings to be noted while you modify them; you should take care to align
the VirtualSize and VirtualAddress according to OptionalHeader->SectionAlignment,
as well as SizeOfRawData and PointerToRawData in line with OptionalHeader->FileAlignment. Otherwise,
you will corrupt your target EXE file and it will never run. Regarding Characteristics, I pay attention mostly to establish a section by IMAGE_SCN_MEM_READ | IMAGE_SCN_MEM_WRITE | IMAGE_SCN_CNT_INITIALIZED_DATA, I prefer my new section has ability to initialize such data during running
process; such as import table; besides, I need it to be able to modify itself
by the loader with my settings in the section characteristics to read- and
writeable.
�����������ڹ۲�PE�ļ������ڴ����ļ�����Windows���������ͨ��IMAGE_NT_HEADERS-> OptionalHeader->SizeOfImageΪ�������������ڴ�ռ����������ε�λ�úʹ�С���Լ�ʾ���������͵����ԡ�Ϊ�˸��õ�������ǰ������������ͷ���ҽ�������MSDN library����IMAGE_SECTION_HEADER�ṹ�ĵط�������ͣ��������EXE packer��������˵��VirtualSize VirtualSize��VirtualAddress�� SizeOfRawData�� PointerToRawData���� Characteristics��Ԫ�dz���Ҫ��������Ϥ���ǣ���������Ū���ƹ�֮�С�����������ʱ����Ҫע����ǣ�Ӧ������OptionalHeader->SectionAlignment�� SizeOfRawData���Լ���OptionalHeader->FileAlignmentһ�µ�PointerToRawData����ϸ����VirtualSize��VirtualAddress�������ƻ�EXE�ļ����������������зϡ�����Characteristics���ҷdz���עͨ��IMAGE_SCN_MEM_READ | IMAGE_SCN_MEM_WRITE | IMAGE_SCN_CNT_INITIALIZED_DATA���������Σ��Ҹ�ϲ���ҵ������ο��������й����г�ʼ����Щ���ݣ����������������֮�⣬�һ���Ҫ����ͨ���������������õĶ�/д���ԣ��ڼ���ʱʵ�������ġ�
Moreover, you should pay attention to the section names, you can know the purpose of each section by its name.
I will just forward you to section 6: Microsoft Portable Executable and the Common Object File Format
Specification documents. I believe, it represents
the totality of sections by their names, Table 2.
���⣬�㻹Ӧ��ע����������ͨ����������Դ����˽�ÿ�����ε����á��ҽ�����������Ķ�Microsoft Portable Executable and the Common Object File Format
Specification�ĵ��ĵ�6�ڡ�����Ϊ�����Ѿ����������е����Σ�����2��
| ".text" |
Code Section |
| "CODE" |
Code Section of file linked by Borland
Delphi or Borland Pascal |
| ".data" |
Data Section |
| "DATA" |
Data Section of file linked by Borland
Delphi or Borland Pascal |
| ".rdata" |
Section for Constant Data |
| ".idata" |
Import Table |
| ".edata" |
Export Table |
| ".tls" |
TLS Table |
| ".reloc" |
Relocation Information |
| ".rsrc" |
Resource Information |
To comprehend the section headers and also the sections,
you can run the sample PE
viewer. By this PE viewer, you only can realize the application of the
section headers in a file image, so to observe the main significance in
the Virtual Memory, you should try to load a PE file by a debugger, and
the next section represents the main idea of using the virtual address and
�Csize in the virtual memory by using a debugger. The last note is about
IMAGE_NT_HEADERS-> FileHeader-><CODE>NumberOfSections,
that provides a number of sections in a PE file, do not forget to adjust
it whenever you remove or add some sections to a PE file, I am talking about
section injection!
Ϊ�˳����������ͷ�����Σ����������PE
viewer������ͨ��PE
viewer����ֻ���˽�����ͷ���ļ�ӳ���е��������ˣ�Ϊ�˹۲���Ҫ�������ڴ��еIJ��֣���Ӧ�ó����õ���������PE�ļ������ǽ������������ڵ��������������������ڴ��е������ַ���Csize�����Ҫע�����IMAGE_NT_HEADERS-> FileHeader-><CODE>NumberOfSections�����ṩPE�ļ���������������������/ɾ�����Σ�����Ҫ���˵���������Ϊ���������۵�������ע�룿
3 Debugger, Disassembler and some Useful Tools
3 �����������������һЩ���õĹ���
In this part, you will become familiar with the necessary
and essential equipments to develop your PE tools.
���ⲿ�֣������ܿ���PE����������Ļ���װ����
3.1 ������
The first essential prerequisite, to become a PE tools developer,
is to have enough experience with bug tracer tools. Furthermore, you should
know most of the assembly instructions. To me, the Intel documents are the
best references. You can obtain them from the Intel site for IA-32, and
on top of that IA-64; the future belongs to IA-64 CPUs, Windows XP 64-bit,
and also PE64!
��ΪPE���߿����ߵĻ���������Ҫ��ʹ��bug���ٹ��ߵķḻ���飻���⣬��Ӧ����Ϥ�ֻ��ָ�Ϊ����˵��Intel�ĵ�����õIJο��顣����Դ�Intel��վ���ҵ�IA-32��IA-64���ĵ���δ������IA-64CPU��64λWindows XP���Լ�PE64��
- IA-32 Intel Architecture
Software Developer��s Manuals.
- Intel Itanium Architecture
Assembly Language Reference Guide.
- The Intel Itanium
Processor Developer Resource Guide.
To trace a PE file, SoftICE by Compuware Corporation, I
knew it also as named NuMega when I was at high school, is the best debugger in the
world. It implements process tracing by using kernel mode
method debugging without applying Windows debugging application programming interface (API) functions. In addition,
I am going to introduce one perfect debugger in user mode level.
It utilizes the Windows debugging API to trace a PE file and also attaches
itself to an active process. These API functions have been provided by Microsoft teams, inside
the Windows Kernel32 library, to trace a specific process, by using Microsoft
tools, or perhaps, to make your own debugger! Some of those API functions inlude: CreateThread(), CreateProcess(), OpenProcess(), DebugActiveProcess(), GetThreadContext(), SetThreadContext(), ContinueDebugEvent(), DebugBreak(), ReadProcessMemory(), WriteProcessMemory(), SuspendThread(), and ResumeThread().
�Ը��ٷ���PE�ļ���˵��Compuware Corporation����������ѧ��ʱ������������NuMega����˾��SoftICE�ǵ�����õ�������֮һ������kernel mode���ԣ���ʹ��Windows����API��application programming interface������������֮�⣬�һ�������һ�������ġ�user mode�µĵ�����������Windows debugging API���ٷ���PE�ļ���Ҳ�ܸ��ϻ����������Windows Kernel32 library���ṩ��ЩAPI���������Ĺ��ߣ��������㶨�Ƶĵ������������������Ǹ��پ���Ľ��̣���Щ����������CreateThread(), CreateProcess(), OpenProcess(), DebugActiveProcess(), GetThreadContext(), SetThreadContext(), ContinueDebugEvent(), DebugBreak(), ReadProcessMemory(), WriteProcessMemory(), SuspendThread(), and ResumeThread()��
It was in 1987; Frank Grossman and Jim Moskun decided to
establish a company called NuMega Technologies in
����1987�ꣻFrank Grossman��Jim Moskun�������º���ʲ����Nashua����һ�ҽ���NuMega Technologies��˾��Ϊ���ٲ�����Windows����Ŀɿ��Կ���һЩ������Ʒ�����ڣ�����ΪCompuware Corporation��һ���֣����IJ�Ʒ���ڿ�������Windows�����Ŀɿ��ԣ�����Windows
�����������̡����ڣ�ÿ���˶�֪����Compuware
DriverStudio����Windows Driver
Development Kit (DDK)�����ں�������ϵͳ�ļ��Ŀ�����������ΪWindowsϵͳ�����������ṩ���ƹ�DDK�ĸ����ԣ�ʵ���ں˼�PE�ļ��ı�������������˵��ֻ��ҪDriverStudio��һ���֨D�DSoftICE���������������������ÿһ��PE�ļ������������û�ģʽ���������ں�ģʽ��
| EAX=00000000 EBX=7FFDD000 ECX=0007FFB0 EDX= |
| 0023:01013000 00 00 00 00 00 00 00 00-00
00 00 00 00 00 00 00 ................ |
| 0010:0007FFC4 |
| 010119E0 PUSH EBP |
| :_ |
It was about 4 years ago, that I first saw this debugger
by chance. For me, it was the best choice, I was not so wealthy to purchase
SoftICE, and at that time, SoftICE only had good functions for DOS, Windows 98,
and Windows
2000. I found that this debugger supported all kinds of Windows versions.
Therefore, I started to learn it very fast, and now it is my favorite debugger
for the Windows OS. It is a debugger that can be used to trace all kinds
of portable executable files except a Common Language Infrastructure (CLI) file format in user mode
level, by using the Windows debugging API. Oleh Yuschuk, the author, is
one of worthiest software developers I have seen in my life. He is a Ukrainian
who now lives in
��Լ4��ǰ��һ��żȻ�Ļ��ᣬ�ҵ�һ�μ����������������������˵��������õ�ѡ����Ϊ�ڵ�ʱ����û�кܶ�Ǯ����SoftICE��������ʱ��SoftICEֻ��DOS��Windows
98��Windows 2000���ܵñȽϺã������������֧�����а汾��Windows����ˣ�������ѧϰ����ʹ���������ڣ����ѳ�Ϊ����ϲ���ĵ���������ʹ��Windows debugging API�����Ը����û�ģʽ�³�Common Language Infrastructure (CLI)�ļ���ʽ֮�������PE�ļ����������ߨD�DOleh Yuschuk�����Ҽ�������ܳ��ij���Ա�������ڿ����ˣ������ڵ¹��������һ�Ҫ��һ�£����ĵ�������ȫ����ڿͺ�cracker�����ѡ�������������������������ԣ�������ҳ��OllyDbg
Homepage��

I have introduced two debuggers without talking about how
you can employ them, and also which parts you should pay attention more.
Regarding using debuggers, I refer you to their instructions in help documents.
However, I want to explain shortly the important parts of a debugger; of
course, I am talking about low-level debuggers, or in other words, machine-language
debuggers of the x86 CPU families.
���Ѿ�������������������ȴû���ۼ�������ʹ�����ǣ�Ҳ��˵����Ӧ��ע���IJ��֡����ڵ��������������ʹ�ã����ǵİ����ĵ����кܺõ�˵����Ȼ�����һ��Ǽ�̵�˵��һ�µ������е���Ҫ���֣���Ȼ��������̸�۵��ǵͼ��������������仰˵��x86CPUϵ�еĻ������Ե�������
All of low-level debuggers consist of the following subdivisions:
�ͼ������������������IJ��֣�
- Registers
viewer.
| EAX |
| ECX |
| EDX |
| EBX |
| ESP |
| EBP |
| ESI |
| EDI |
| EIP |
| o d t s z a p c |
- Disassembler
or Code viewer.
| 010119E0 PUSH EBP 010119E1 MOV EBP,ESP 010119E3 PUSH -1 010119E5 PUSH 01001570 010119EA PUSH 01011D60 010119EF MOV EAX,DWORD PTR FS:[0] 010119FD ADD ESP,-68 |
- Memory
watcher.
| 0023:01013000 00 00 00 00 00 00 00 00-00
00 00 00 00 00 00 00 ................ |
- Stack viewer.
| 0010:0007FFC4 |
- Command
line, command buttons, or shortcut keys to follow the debugging process.
- �����У����ť����һЩ��ݼ���
| Command |
SoftICE |
OllyDbg |
| Run |
F5 |
F9 |
| Step Into |
F11 |
F7 |
| Step Over |
F10 |
F8 |
| Set Break Point |
F8 |
F2 |
You can compare Figure
1 and Figure
2 to distinguish the difference between SoftICE and OllyDbg. When you
want to trace a PE file, you should mostly consider these five subdivisions.
Furthermore, every debugger comprises of some other useful parts; you should
discover them by yourself.
����ԱȽ�Figure
1��Figure
2���ֱ�SoftICE��OllyDbg֮�����ͬ�����������ٷ���PE�ļ�ʱ����ҪҪ������������֡����⣬������������һЩ���������ò��֣���Ӧ���Լ�ȥ���֡�
3.2 �������
We can consider OllyDbg and SoftICE as excellent disassemblers,
but I also want to introduce another disassembler tool which is famous in
the reverse engineering world.
OllyDbg��SoftICE��������õĵ�������Ҳ���൱�����ķ����������Ȼ��ˣ�����������������������������ķ��������
Proview or PVDasm is an admirable disassembler by the Reverse-Engineering-Community;
it is still under development and bug fixing. You can find its disassmbler
source engine and employ it to create your own disassembler.
Proview��PVDasm��Reverse-Engineering-Community�б��������ķ�����������Դ��ڷ�չ�����С�����ҵ����ķ�������棬�����������������Լ��ķ��������
W32DASM can disassemble both 16 and 32 bit executable file
formats. In addition to its disassembling ability, you can employ it to
analyze import, export and resource data directories data.
W32DASM���Է����16��32λ�Ŀ�ִ���ļ���ʽ���������ķ�����������㻹�������������������������������Դ���ݺ�Ŀ¼���ݡ�
All reverse-engineering experts know that IDA Pro
can be used to investigate, not only x86 instructions, but that of various
kinds of CPU types like AVR, PIC, and etc. It can illustrate the assembly
source of a portable executable file by using colored graphics and tables,
and is very useful for any newbie in this area. Furthermore, it has the
capability to trace an executable file inside the user mode level in the
same way as OllyDbg.
���е�����ר�Ҷ�֪��IDA Pro�������о��������͵�CPU������AVR��PIC���ȵȣ�������������x86ƽ̨���������ò�ɫͼ�κͱ���ͼ��PE�ļ��Ļ����䣬�������������������˵�dz��а��������⣬����������OllyDbgһ�������û�ģʽ�¸��٣����ԣ���ִ���ļ���
3.3 һЩ���õĹ���
A good PE tools developer is conversant with the tools which
save his time, so I recommend to select some appropriate
instruments to investigate the base information under a portable executable
file.
�����PE���߿�����Ӧ���������ն��ֹ��ߣ����ܽ�ʡʱ�䣬��ˣ��Ҿ�����ѡ��һЩ���ߣ������������о�PE�ļ���Ļ�����Ϣ��
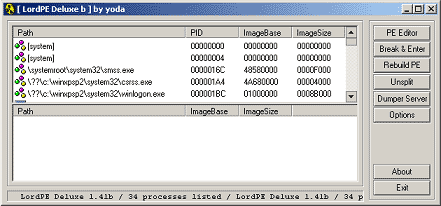
LordPE by y0da is still the first choice to retrieve PE file information
with the possibility to modify them.
y0da��LordPE���Dz鿴PE�ļ���Ϣ�ĵ�һѡ�����������е����ݡ�
PE iDentifier
is valuable to identify the type of compilers, packers, and cryptors
of PE files. As of now, it can detect more than 500 different signature
types of PE files.
PE iDentifier
�dz�����������ʶ���������packers��PE�ļ���cryptors�����͡���ĿǰΪֹ�������Լ��500�����ϵ�PE�ļ����͡�
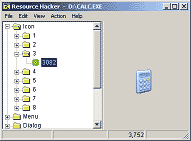
Resource Hacker can be employed to modify resource directory
information; icon, menu, version info, string table, and etc.
������Resource Hacker ����ԴĿ¼��Ϣ��ͼ�꣬�˵����汾��Ϣ���ַ��������ȵȡ�
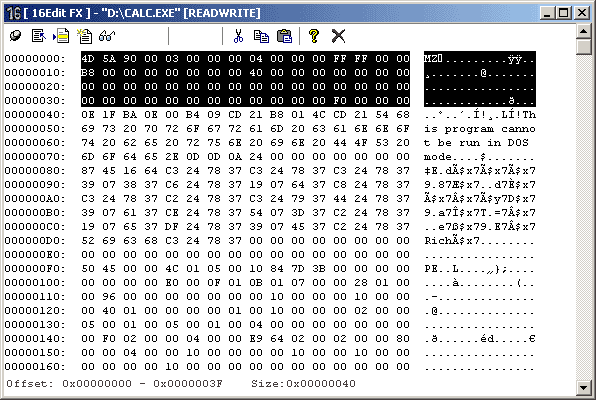
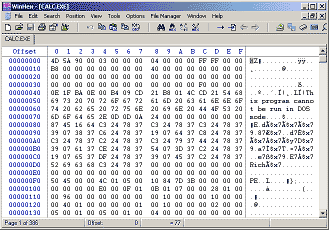
WinHex, it is clear what you can do with this tool.
WinHex��ͨ���������֣��Ϳ����˽�������ʲô�ˡ�
Eventually, CFF Explorer by Ntoskrnl is
what you wish to have as a PE Utility tool in your dream; it supports PE32/64,
PE rebuild included Common Language Infrastructure (CLI) file, in other words,
the .NET
file, a resource modifier, and much more facilities which can not be
found in others, just try and discover every unimaginable option by hand.
���Ntoskrnl ��CFF Explorer �����������ж���ӵ�е�PE���ߣ���֧��PE32/64��PE rebuild������Common Language Infrastructure (CLI)�ļ������仰˵��֧��.NET file������Դ���������������������в��������ı������ܣ�ֻ���������ã����ܷ�����Щ����˼���ѡ�
4 Add new section and Change OEP
4�����������OEP
We are ready to do the first step of making our project.
So I have provided a library to add a new section and rebuild the portable
executable file. Before starting, I like you get familiar with the headers
of a PE file, by using OllyDbg.
You should first open a PE file, that pops up a menu, View->Executable
file, again get a popup menu Special->PE header. And you will
observe a scene similar to Figure
3. Now, come to Main Menu View->Memory, try to distinguish
the sections inside the Memory map window.
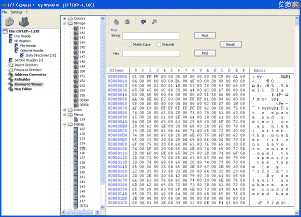
���������б���Ŀ�ĵ�һ������ˣ����ṩ��һ��library������һ�������β��ؽ�PE�ļ����ڿ�ʼ֮ǰ����ϣ������OllyDbg��ϤPE�ļ���ͷ��������Ӧ�ô�һ��PE�ļ���Ȼ��ѡ��˵�View->Executable modules��ԭ����Executable file���Ҹ���OllyDbg 1.10�汾�ij�Executable modules�����ڵ����Ĵ�����ѡ��Ҫ�鿴���ļ��������Ҽ����ڵ����IJ˵���ѡ��Special->PE header���㽫���Կ�������Figure 3�����ݡ����ڣ������˵���ѡ��View->Memory��������Memory map�������������Ρ�
| 00000000 00000002 00000004 00000006 00000008 0000000E 00000010 00000012 00000014 00000016 00000018 0000001D 0000001E 00000020 00000021 00000022 00000023 00000024 00000025 00000026 00000027 00000028 00000029 0000002B 0000002D 0000002E 00000030 00000031 00000032 00000033 00000034 00000035 00000036 00000037 00000038 00000039 0000003B |
4D 9000 0300 0000 0400 0000 FFFF 0000 B800 0000 0000 0000 4000 0000 00 00 00 00 00 00 00 00 00 00 00 00 00 00 00 00 00 00 00 00 00 00 00 00 00 00 00 00 00 00 00 00 F0000000 |
ASCII "MZ" DW 0090 DW 0003 DW 0000 DW 0004 DW 0000 DW FFFF DW 0000 DW 00B8 DW 0000 DW 0000 DW 0000 DW 0040 DW 0000 DB 00 DB 00 DB 00 DB 00 DB 00 DB 00 DB 00 DB 00 DB 00 DB 00 DB 00 DB 00 DB 00 DB 00 DB 00 DB 00 DB 00 DB 00 DB 00 DB 00 DB 00 DB 00 DB 00 DB 00 DB 00 DB 00 DB 00 DB 00 DB 00 DB 00 DB 00 DB 00 DD |
DOS EXE Signature DOS_PartPag = 90 (144.) DOS_PageCnt = 3 DOS_ReloCnt = 0 DOS_HdrSize = 4 DOS_MinMem = 0 DOS_MaxMem = FFFF (65535.) DOS_ReloSS = 0 DOS_ExeSP = B8 DOS_ChkSum = 0 DOS_ExeIP = 0 DOS_ReloCS = 0 DOS_TablOff = 40 DOS_Overlay = 0 Offset to PE signature |
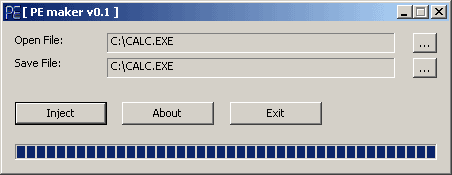
I want to explain how we can plainly change the Offset of
Entry Point (OEP) in our sample
file, CALC.EXE of Windows XP. First, by using a PE Tool, and
also using our PE Viewer, we find OEP, 0x00012475, and Image Base, 0x01000000.
This value of OEP is the Relative Virtual Address, so the Image Base value
is used to convert it to the Virtual Address.
���ȣ�����˵������Ӧ�������ı�sample
file�D�DWindows
XP��CALC.EXE�D�D��OEP��Offset of Entry Point�������ȣ���PE Viewer����OEP��0x00012475��Image Base��0x01000000��OEP��ֵ��RVA��Relative Virtual Address������ˣ���Image
Base��ֵ����ת��ΪVA��Virtual Address����
| Virtual_Address = Image_Base + Relative_Virtual_Address |
DWORD OEP_RVA = image_nt_headers->OptionalHeader.AddressOfEntryPoint ;
// OEP_RVA = 0x00012475
DWORD OEP_VA = image_nt_headers->OptionalHeader.ImageBase
+ OEP_RVA ;
// OEP_VA = 0x01000000 + 0x00012475
= 0x01012475
DynLoader(), in loader.cpp,
is reserved for the data of the new section, in other words, the Loader.
loader.cpp�е�DynLoader()��Ϊ�����ε����ݱ����ģ����仰˵����Loader��
__stdcall void DynLoader()
{
_asm
{
//----------------------------------
DWORD_TYPE(DYN_LOADER_START_MAGIC)
//----------------------------------
MOV EAX,01012475h
// << Original OEP
JMP EAX
//----------------------------------
DWORD_TYPE(DYN_LOADER_END_MAGIC)
//----------------------------------
}
}
Unfortunately, this source can only be applied for the sample
test file. We should complete it by saving the value of the original
OEP in the new section, and use it to reach the real OEP. I have accomplished
it in Step 2 (Section 5).
���ҵ��ǣ����Դ��ֻ������sample
test file������Ӧ�ð�ԭʼ��OEP�������������Ȼ������Ѱ��������OEP�������������ӡ��ҽ�����Ŀ�ĵ�2������5���֣��������
4.1 Retrieve and Rebuild
PE file
4.1 �һز��ؽ�PE�ļ�
I have made a simple class library to recover PE information
and to use it in a new PE file.
���ṩһ������⣬�����ڻָ�PE��Ϣ��������PE�ļ���ʹ����Щ��Ϣ��
//----------------------------------------------------------------
class CPELibrary
{
private:
//-----------------------------------------
PCHAR
pMem;
DWORD
dwFileSize;
//-----------------------------------------
protected:
//-----------------------------------------
PIMAGE_DOS_HEADER image_dos_header;
PCHAR
pDosStub;
DWORD
dwDosStubSize, dwDosStubOffset;
PIMAGE_NT_HEADERS image_nt_headers;
PIMAGE_SECTION_HEADER image_section_header[MAX_SECTION_NUM];
PCHAR
image_section[MAX_SECTION_NUM];
//-----------------------------------------
protected:
//-----------------------------------------
DWORD PEAlign(DWORD
dwTarNum,DWORD dwAlignTo);
void AlignmentSections();
//-----------------------------------------
DWORD Offset2RVA(DWORD
dwRO);
DWORD RVA2Offset(DWORD
dwRVA);
//-----------------------------------------
PIMAGE_SECTION_HEADER ImageRVA2Section(DWORD dwRVA);
PIMAGE_SECTION_HEADER ImageOffset2Section(DWORD dwRO);
//-----------------------------------------
DWORD ImageOffset2SectionNum(DWORD
dwRVA);
PIMAGE_SECTION_HEADER AddNewSection(char* szName,DWORD dwSize);
//-----------------------------------------
public:
//-----------------------------------------
CPELibrary();
~CPELibrary();
//-----------------------------------------
void OpenFile(char* FileName);
void SaveFile(char* FileName);
//-----------------------------------------
};
By Table 1,
the usage of image_dos_header, pDosStub, image_nt_headers,
image_section_header [MAX_SECTION_NUM], and image_section[MAX_SECTION_NUM] is clear. We use OpenFile() and SaveFile()
to retrieve and rebuild a PE file. Furthermore, AddNewSection() is employed to create
the new section, the important step.
��Table 1��image_dos_header, pDosStub, image_nt_headers,
image_section_header [MAX_SECTION_NUM]���� image_section[MAX_SECTION_NUM]���÷��Ѿ�д�ú������������OpenFile()��SaveFile()�һز��ؽ�PE�ļ������⣬��AddNewSection()�������Σ�������Ҫ��һ����
4.2 Create Data for new
Section
4.2 �����������
In pecrypt.cpp, I have represented another class,
CPECryptor,
to comprise the data of the new section. Nevertheless, the data of the new
section is created by DynLoader() in loader.cpp, DynLoader
Step 1. We use the CPECryptor class to enter this data in to the new section,
and also some other stuff.
��pecrypt.cpp����ṩ������һ����D�DCPECryptor�������齨�����ε����ݡ�Ȼ���������ε������DZ�loader.cpp���DynLoader()����DynLoader
Step 1�н��ܵģ������ġ���ˣ�������CPECryptor�����Щ���ݣ�Ҳ�����������ݣ����������Ρ�
//----------------------------------------------------------------
class CPECryptor: public CPELibrary
{
private:
//----------------------------------------
PCHAR pNewSection;
//----------------------------------------
DWORD GetFunctionVA(void* FuncName);
void* ReturnToBytePtr(void* FuncName, DWORD
findstr);
//----------------------------------------
protected:
//----------------------------------------
public:
//----------------------------------------
void CryptFile(int(__cdecl *callback)
(unsigned int, unsigned int));
//----------------------------------------
};
//----------------------------------------------------------------
4.3
Some notes regarding creating a new PE file
4.3 ������PE�ļ�ʱӦ��ע��ĵط�
- Align the
VirtualAddress and the VirtualSize of each section by SectionAlignment:
��
image_section_header[i]->VirtualAddress=
��
PEAlign(image_section_header[i]->VirtualAddress,
��
image_nt_headers->OptionalHeader.SectionAlignment);
��
��
image_section_header[i]->Misc.VirtualSize=
��
PEAlign(image_section_header[i]->Misc.VirtualSize,
image_nt_headers->OptionalHeader.SectionAlignment);
- Align the
PointerToRawData and the SizeOfRawData of each section by FileAlignment:
��
image_section_header[i]->PointerToRawData
=
��
PEAlign(image_section_header[i]->PointerToRawData,
��
image_nt_headers->OptionalHeader.FileAlignment);
��
��
image_section_header[i]->SizeOfRawData
=
��
PEAlign(image_section_header[i]->SizeOfRawData,
image_nt_headers->OptionalHeader.FileAlignment);
- Correct
the SizeofImage by the virtual size and the virtual address of the
last section:
��
image_nt_headers->OptionalHeader.SizeOfImage
=
��
image_section_header[LastSection]->VirtualAddress
+
image_section_header[LastSection]->Misc.VirtualSize;
- Set the
Bound Import Directory header to zero, as this directory is not very important
to execute a PE file:
��
image_nt_headers->
��
OptionalHeader.DataDirectory[IMAGE_DIRECTORY_ENTRY_BOUND_IMPORT].
��
VirtualAddress = 0;
��
image_nt_headers->
OptionalHeader.DataDirectory[IMAGE_DIRECTORY_ENTRY_BOUND_IMPORT].Size
= 0;
4.4
Some notes regarding linking this VC Project
4.4 �����������VC��ĿʱӦ��ע��ĵط�
- Set Linker->General->Enable
Incremental Linking to No (/INCREMENTAL:NO).
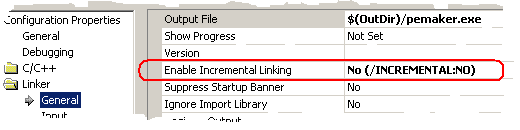
You can comprehend the difference between
incremental link and no-incremental link by looking at the following picture:
ͨ����ͼ����Ӧ���������������������������֮�������
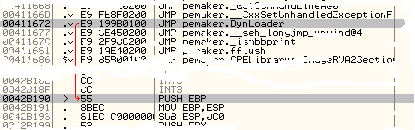
To acquire the virtual address of DynLoader(), we obtain the virtual
address of JMP pemaker.DynLoader in the incremental
link, but by no-incremental link, the real virtual address is gained by
the following code:
Ϊ�˵õ�DynLoader()��virtual address��������������������Եõ�JMP pemaker.DynLoader
��virtual address�������ڷ����������ֻ��ͨ������Ĵ���õ�������virtual
address��
DWORD dwVA= (DWORD) DynLoader;
This setting is more critical in the incremental
link when you try to find the beginning and ending of the Loader,
DynLoader(),
by CPECryptor::ReturnToBytePtr():
�����跨ͨ��CPECryptor::ReturnToBytePtr()�ҳ�DynLoader()�D�DLoader�Ŀ�ʼ�ͽ������֣����������������������Ե���Ϊ��Ҫ��
void* CPECryptor::ReturnToBytePtr(void* FuncName, DWORD findstr)
{
void* tmpd;
__asm
{
mov eax, FuncName
jmp df
hjg: inc
eax
df:
mov ebx, [eax]
cmp ebx, findstr
jnz hjg
mov tmpd, eax
}
return tmpd;
}
5 Store Important Data and Reach Original OEP
5 ������Ҫ�����ݲ��ҵ�ԭʼ��OEP
Right now, we save the Original OEP and also the Image Base
in order to reach to the virtual address of OEP. I have reserved a free
space at the end of DynLoader()
to store them, DynLoader
Step 2.
Ϊ���ҵ�OEP��virtual address��������������ԭʼ��OEP��Image Base������DynLoader()��β��Ԥ����һ��յ����������ǣ�DynLoader
Step 2��
__stdcall void DynLoader()
{
_asm
{
//----------------------------------
DWORD_TYPE(DYN_LOADER_START_MAGIC)
//----------------------------------
Main_0:
PUSHAD
// get base ebp
CALL Main_1
Main_1:
POP EBP
SUB EBP,OFFSET
Main_1
MOV EAX,DWORD
PTR [EBP+_RO_dwImageBase]
ADD EAX,DWORD
PTR [EBP+_RO_dwOrgEntryPoint]
PUSH EAX
RETN // >> JMP to Original OEP
//----------------------------------
DWORD_TYPE(DYN_LOADER_START_DATA1)
//----------------------------------
_RO_dwImageBase: DWORD_TYPE(0xCCCCCCCC)
_RO_dwOrgEntryPoint:
DWORD_TYPE(0xCCCCCCCC)
//----------------------------------
DWORD_TYPE(DYN_LOADER_END_MAGIC)
//----------------------------------
}
}
The new function, CPECryptor::CopyData1(),
will implement the copy of the Image Base value and the Offset of Entry
Point value into 8 bytes of free space in the loader.
�º����D�DCPECryptor::CopyData1()�D�D����Image Baseֵ��OEPֵ���Ƶ�loader����пռ��8�ֽ��
5.1 Restore the first
Registers Context
5.1 �ָ�����Ĵ�����������
It is important to recover the Original Context of the thread.
We have not yet done it in the DynLoader
Step 2 source code. We can modify the source of DynLoader() to repossess the first
Context.
�ָ��̵߳�ԭʼ�����ĺ���Ҫ��������������DynLoader
Step 2��Դ���ﲢû�������������ǿ�����DynLoader()��Դ�룬���µõ�����������ġ�
__stdcall void DynLoader()
{
_asm
{
//----------------------------------
DWORD_TYPE(DYN_LOADER_START_MAGIC)
//----------------------------------
Main_0:
PUSHAD// Save the registers context in stack
CALL Main_1
Main_1:
POP EBP// Get Base EBP
SUB EBP,OFFSET
Main_1
MOV EAX,DWORD
PTR [EBP+_RO_dwImageBase]
ADD EAX,DWORD
PTR [EBP+_RO_dwOrgEntryPoint]
MOV DWORD PTR [ESP+1Ch],EAX // pStack.Eax <-
EAX
POPAD // Restore the first registers context from
stack
PUSH EAX
XOR EAX, EAX
RETN // >> JMP to Original OEP
//----------------------------------
DWORD_TYPE(DYN_LOADER_START_DATA1)
//----------------------------------
_RO_dwImageBase:
DWORD_TYPE(0xCCCCCCCC)
_RO_dwOrgEntryPoint:
DWORD_TYPE(0xCCCCCCCC)
//----------------------------------
DWORD_TYPE(DYN_LOADER_END_MAGIC)
//----------------------------------
}
}
5.2 Restore the Original
Stack
5.2 �ָ�ԭʼ��ջ
We can also recover the original stack by setting the value
of the beginning stack + 0x34 to the Original OEP, but it is not very
important. Nevertheless, in the following code, I have accomplished the
loader code by a simple trick to reach OEP in addition to redecorating the
stack. You can observe the implementation by tracing using OllyDbg or SoftICE.
����Ҳ������ԭʼOEP�Ļ����ϣ�����ջ����ʼֵ+0x34 ���ָ�ԭ����ջ���������Ƿdz���Ҫ��������������Ĵ����У���ͨ��һ��С�����ҵ�OEP����������ջ�����loader���롣�������OllyDbg��SoftICE�۲�����ʵ�֡�
__stdcall void DynLoader()
{
_asm
{
//----------------------------------
DWORD_TYPE(DYN_LOADER_START_MAGIC)
//----------------------------------
Main_0:
PUSHAD // Save the registers context in stack
CALL Main_1
Main_1:
POP EBP
SUB EBP,OFFSET
Main_1
MOV EAX,DWORD
PTR [EBP+_RO_dwImageBase]
ADD EAX,DWORD
PTR [EBP+_RO_dwOrgEntryPoint]
MOV DWORD PTR [ESP+54h],EAX // pStack.Eip <-
EAX
POPAD // Restore the first registers context from stack
CALL _OEP_Jump
DWORD_TYPE(0xCCCCCCCC)
_OEP_Jump:
PUSH EBP
MOV EBP,ESP
MOV EAX,DWORD
PTR [ESP+3Ch] // EAX <- pStack.Eip
MOV DWORD PTR [ESP+4h],EAX // _OEP_Jump RETURN pointer <- EAX
XOR EAX,EAX
LEAVE
RETN
//----------------------------------
DWORD_TYPE(DYN_LOADER_START_DATA1)
//----------------------------------
_RO_dwImageBase:
DWORD_TYPE(0xCCCCCCCC)
_RO_dwOrgEntryPoint:
DWORD_TYPE(0xCCCCCCCC)
//----------------------------------
DWORD_TYPE(DYN_LOADER_END_MAGIC)
//----------------------------------
}
}
5.3
Approach OEP by Structured Exception Handling
5.3 ͨ��SEH�ӽ�OEP
An exception is generated when a program falls into a fault
code execution and an error happens, so in such a special condition, the
program immediately jumps to a function called the exception handler from
exception handler list of the Thread
Information Block.
������������ϻ�������ʱ�������쳣��������������£���������ת��һ������������Thread
Information Block�쳣���������б��е��쳣��������
The next example of a try-except statement
in C++ clarifies the operation of structured exception handling. Besides the assembly code of
this code, it elucidates the structured exception handler installation,
the raise of an exception, and the exception handler function.
���������ܵ�try-except statement���ӣ���C++������structured exception handling�IJ��������������֮��Ļ�����˵����SEH��װ�������쳣�����쳣������������
#include "stdafx.h"
#include "windows.h"
void RAISE_AN_EXCEPTION()
{
_asm
{
INT 3
INT 3
INT 3
INT 3
}
}
int _tmain(int argc, _TCHAR* argv[])
{
__try
{
__try{
printf("1: Raise an Exception\n");
RAISE_AN_EXCEPTION();
}
__finally
{
printf("2: In Finally\n");
}
}
__except(
printf("3: In Filter\n"), EXCEPTION_EXECUTE_HANDLER )
{
printf("4: In Exception
Handler\n");
}
return 0;
}
; main()
00401000: PUSH EBP
00401001: MOV EBP,ESP
00401003: PUSH -1
00401005: PUSH 00407160
; __try {
; the structured exception
handler (SEH) installation
00401015: PUSH EAX
00401016: MOV DWORD PTR FS:[0],ESP
0040101D: SUB ESP,8
00401020: PUSH EBX
00401021: PUSH ESI
00401022: PUSH EDI
00401023: MOV DWORD PTR SS:[EBP-18],ESP
; __try {
00401026: XOR ESI,ESI
00401028: MOV DWORD PTR SS:[EBP-4],ESI
0040102B: MOV DWORD PTR SS:[EBP-4],1
00401032: PUSH OFFSET "1: Raise an Exception"
00401037: CALL printf
; the raise a exception,
INT 3 exception
; RAISE_AN_EXCEPTION()
00401040: INT3
00401041: INT3
00401042: INT3
; } __finally {
00401043: MOV DWORD PTR SS:[EBP-4],ESI
00401046: CALL 0040104D
0040104B: JMP 00401080
0040104D: PUSH OFFSET "2: In Finally"
00401052: CALL printf
00401057: ADD ESP,4
; }
; }
; __except(
0040105B: JMP 00401080
0040105D: PUSH OFFSET "3: In Filter"
00401062: CALL printf
00401067: ADD ESP,4
; , EXCEPTION_EXECUTE_HANDLER )
; {
; the exception handler
funtion
00401070: MOV ESP,DWORD
PTR SS:[EBP-18]
00401073: PUSH OFFSET "4: In Exception Handler"
00401078: CALL printf
0040107D: ADD ESP,4
; }
00401080: MOV DWORD PTR SS:[EBP-4],-1
; restore previous SEH
0040108E: MOV ECX,DWORD
PTR SS:[EBP-10]
00401091: MOV DWORD PTR FS:[0],ECX
00401098: POP EDI
00401099: POP ESI
0040109B: MOV ESP,EBP
0040109D: POP EBP
0040109E: RETN
Make a Win32 console project, and link and run the preceding
C++ code, to perceive the result:
����һ��Win32����̨��Ŀ�����Ӳ�����ǰ����˵��C++���룬�۲�����
| 1: Raise an Exception |
This program runs the exception expression, printf("3: In Filter\n");, when an exception happens, in this example
the INT 3
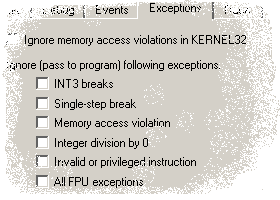
exception. You can employ other kinds of exception too. In OllyDbg, Debugging options->Exceptions,
you can see a short list of different types of exceptions.
���쳣����ʱ������������е��쳣����ʽ�D�Dprintf("3: In Filter\n");���������������INT 3 �쳣����Ȼ����Ҳ����ʹ���������͵��쳣����OllyDbg�ѡ��Debugging options->Exceptions������Կ�����ͬ���͵��쳣�ļ���б���
We desire to construct a structured exception handler in
order to reach OEP. Now, I think you have distinguished the SEH installation,
the exception raise, and the exception expression filter, by foregoing the
assembly code. To establish our exception handler approach, we need to comprise
the following codes:
�����빹��һ��SEH��Ѱ��OEP�����ڣ�������ͨ���Ķ�ǰ��Ļ����룬Ӧ���Ѿ���������SEH��װ�������쳣�����쳣����ʽ�������ˡ�Ϊ�˽������ǵ��쳣����������������Ҫ��������Ĵ��룺
- SEH installation:
��
LEA EAX,[EBP+_except_handler1_OEP_Jump]
��
PUSH EAX
��
PUSH DWORD PTR FS:[0]
MOV DWORD PTR FS:[0],ESP
- An Exception
Raise:
INT 3
- Exception
handler expression filter:
��
_except_handler1_OEP_Jump:
��
PUSH EBP
��
MOV EBP,ESP
��
...
��
MOV EAX, EXCEPTION_CONTINUE_SEARCH
// EXCEPTION_CONTINUE_SEARCH = 0
��
LEAVE
RETN
So we yearn for making the ensuing C++ code in assembly
language to inaugurate our engine to approach the Offset of Entry Point
by SEH.
��ˣ����ǿ���ͨ��SEH��ʹ����C++�������û��������ɽӽ�OEP�����档
__try // SEH installation
{
__asm
{
INT
3 // An Exception Raise
}
}
__except( ..., EXCEPTION_CONTINUE_SEARCH
){}
// Exception handler expression
filter
In assembly code...
; ----------------------------------------------------
; the
structured exception handler (SEH) installation
; __try {
LEA EAX,[EBP+_except_handler1_OEP_Jump]
PUSH EAX
PUSH DWORD PTR FS:[0]
MOV DWORD PTR FS:[0],ESP
; ----------------------------------------------------
; the
raise a INT 3 exception
INT 3
INT 3
INT 3
INT 3
; }
; __except( ...
; ----------------------------------------------------
; exception
handler expression filter
_except_handler1_OEP_Jump:
PUSH EBP
MOV EBP,ESP
...
MOV EAX, EXCEPTION_CONTINUE_SEARCH ; EXCEPTION_CONTINUE_SEARCH = 0
LEAVE
RETN
; , EXCEPTION_CONTINUE_SEARCH ) { }
The exception value, __except(..., Value), determines how the exception is handled, it can have three
values, 1, 0, -1. To understand them, refer to the try-except statement
description in the MSDN library. We set it to EXCEPTION_CONTINUE_SEARCH (0),
not to run the exception handler function, therefore by this value, the
exception is not recognized, is simply ignored, and the thread continues
its code-execution.
�쳣ֵ�D�D__except(..., Value)�D�D�����쳣��������������������ֵ��1��0��-1��Ϊ���������ǣ���MSDN library�в���try-except statement���������������������ΪEXCEPTION_CONTINUE_SEARCH (0)���������쳣��������������ˣ�ͨ���������ֵ��ϵͳ���Ͽ�����쳣��ֻ�Ǻ��������߳̽�����ִ�д��롣
How the SEH installation is implemented
As you perceived from the illustrated code, the SEH installation
is done by the FS segment register. Microsoft Windows 32 bit uses the FS
segment register as a pointer to the data block of the main thread. The
first 0x
����Ӳ�ͼ�Ĵ����п����ģ�SEH��װ��FS�μĴ�����ɡ���32λWindows��FS�μĴ�����Ϊָ�����߳����ݿ��ָ�롣��һ��0x
Thread
Information Block (TIB)
typedef struct _NT_TIB32 {
DWORD ExceptionList;
DWORD StackBase;
DWORD StackLimit;
DWORD SubSystemTib;
union {
DWORD
FiberData;
DWORD
Version;
};
DWORD ArbitraryUserPointer;
DWORD Self;
} NT_TIB32, *PNT_TIB32;
Table 3 - FS segment
register and Thread Information Block
| DWORD PTR FS:[00h] |
ExceptionList |
| DWORD PTR FS:[04h] |
StackBase |
| DWORD PTR FS:[08h] |
StackLimit |
| DWORD PTR FS:[0Ch] |
SubSystemTib |
| DWORD PTR FS:[10h] |
FiberData / Version |
| DWORD PTR FS:[14h] |
ArbitraryUserPointer |
| DWORD PTR FS:[18h] |
Self |
In this part, we effectuate our performance by accomplishing
the OEP approach. We change the Context of the thread and ignore every simple
exception handling, and let the thread continue the execution, but in the
original OEP!
����һ���֣�����ͨ�����OEP����ʵ�����ǵ�ִ�С����Ǹı��̵߳������ģ�����ÿһ�����쳣���������̼߳���ִ�У�������ԭʼ��OEP�
When an exception happens, the context of the processor
during the time of the exception is saved in the stack. By EXCEPTION_POINTERS, we have access to the pointer of
ContextRecord. The ContextRecord has the CONTEXT data structure, Table 4, this is the thread context during the exception time. When
we ignore the exception by EXCEPTION_CONTINUE_SEARCH
(0), the instruction pointer
as well the context will be set to ContextRecord in order to
return to the previous condition. Therefore, if we change the Eip
of the Win32
Thread Context to the Original Offset of Entry Point, it will come clearly
into OEP.
���쳣����ʱ������쳣ʱ�ġ��������������ı�����ջ�ͨ��EXCEPTION_POINTERS�����ǿ��Է���ContextRecord��ָ�롣ContextRecord��CONTEXT���ݽṹ���� Table 4�������쳣�ڼ���߳������ġ�������ͨ��EXCEPTION_CONTINUE_SEARCH
(0)�����쳣ʱ��ָ��ָ�루EIP��Ϊ�˷��ص�ԭ����״̬�������������ΪContextRecord����ˣ�������ǰ�Win32
Thread Context��Eip��Ϊԭʼ��OEP�������ԣ������õ�OEP��
MOV EAX, ContextRecord
MOV EDI, dwOEP ; EAX <- dwOEP
MOV DWORD PTR DS:[EAX+0B8h], EDI ; pContext.Eip
<- EAX
Win32
Thread Context structure
#define MAXIMUM_SUPPORTED_EXTENSION 512
typedef struct _CONTEXT {
//-----------------------------------------
DWORD ContextFlags;
//-----------------------------------------
DWORD Dr0;
DWORD Dr1;
DWORD Dr2;
DWORD Dr3;
DWORD Dr6;
DWORD Dr7;
//-----------------------------------------
FLOATING_SAVE_AREA FloatSave;
//-----------------------------------------
DWORD SegGs;
DWORD SegFs;
DWORD SegEs;
DWORD SegDs;
//-----------------------------------------
DWORD Edi;
DWORD Esi;
DWORD Ebx;
DWORD Edx;
DWORD Ecx;
DWORD Eax;
//-----------------------------------------
DWORD Ebp;
DWORD Eip;
DWORD SegCs;
DWORD EFlags;
DWORD Esp;
DWORD SegSs;
//-----------------------------------------
BYTE ExtendedRegisters[MAXIMUM_SUPPORTED_EXTENSION];
//----------------------------------------
} CONTEXT,
*LPCONTEXT;
| Context Flags |
0x00000000 |
ContextFlags |
|
| Context Debug Registers |
0x00000004 |
Dr0 |
|
| 0x00000008 |
Dr1 |
||
| 0x |
Dr2 |
||
| 0x00000010 |
Dr3 |
||
| 0x00000014 |
Dr6 |
||
| 0x00000018 |
Dr7 |
||
| Context Floating Point |
0x |
FloatSave |
StatusWord |
| 0x00000020 |
StatusWord |
||
| 0x00000024 |
TagWord |
||
| 0x00000028 |
ErrorOffset |
||
| 0x |
ErrorSelector |
||
| 0x00000030 |
DataOffset |
||
| 0x00000034 |
DataSelector |
||
| 0x00000038 |
RegisterArea [0x50] |
||
| 0x00000088 |
Cr0NpxState |
||
| Context Segments |
0x |
SegGs |
|
| 0x00000090 |
SegFs |
||
| 0x00000094 |
SegEs |
||
| 0x00000098 |
SegDs |
||
| Context Integer |
0x |
Edi |
|
| 0x |
Esi |
||
| 0x |
Ebx |
||
| 0x |
Edx |
||
| 0x |
Ecx |
||
| 0x000000B0 |
Eax |
||
| Context Control |
0x000000B4 |
Ebp |
|
| 0x000000B8 |
Eip |
||
| 0x000000BC |
SegCs |
||
| 0x |
EFlags |
||
| 0x |
Esp |
||
| 0x |
SegSs |
||
| Context Extended Registers |
0x000000CC |
ExtendedRegisters[0x200] |
|
By the following code, we have accomplished the main purpose
of coming to OEP by the structured exception handler:
ͨ������Ĵ��룬����ͨ��SEH�����ҵ�OEP��
__stdcall void DynLoader()
{
_asm
{
//----------------------------------
DWORD_TYPE(DYN_LOADER_START_MAGIC)
//----------------------------------
Main_0:
PUSHAD // Save the registers context in stack
CALL Main_1
Main_1:
POP EBP
SUB EBP,OFFSET
Main_1 // Get Base EBP
MOV EAX,DWORD
PTR [EBP+_RO_dwImageBase]
ADD EAX,DWORD
PTR [EBP+_RO_dwOrgEntryPoint]
MOV DWORD PTR [ESP+10h],EAX // pStack.Ebx <- EAX
LEA EAX,[EBP+_except_handler1_OEP_Jump]
MOV DWORD PTR [ESP+1Ch],EAX // pStack.Eax <- EAX
POPAD // Restore the first registers context from stack
//----------------------------------------------------
// the structured exception handler (SEH) installation
PUSH EAX
XOR EAX, EAX
PUSH DWORD PTR FS:[0] // NT_TIB32.ExceptionList
MOV DWORD PTR FS:[0],ESP // NT_TIB32.ExceptionList <-ESP
//----------------------------------------------------
// the raise a INT 3 exception
DWORD_TYPE(0xCCCCCCCC)
//--------------------------------------------------------
// -------- exception handler
expression filter ----------
_except_handler1_OEP_Jump:
PUSH EBP
MOV EBP,ESP
//------------------------------
MOV EAX,DWORD
PTR SS:[EBP+010h] // PCONTEXT: pContext <- EAX
//==============================
PUSH EDI
// restore original SEH
MOV EDI,DWORD
PTR DS:[EAX+
PUSH DWORD PTR DS:[EDI]
POP DWORD PTR FS:[0]
ADD DWORD PTR DS:[EAX+
//------------------------------
// set the Eip to the OEP
MOV EDI,DWORD
PTR DS:[EAX+
MOV DWORD PTR DS:[EAX+0B8h],EDI // pContext.Eip
<- EAX
//------------------------------
POP EDI
//==============================
MOV EAX, EXCEPTION_CONTINUE_SEARCH
LEAVE
RETN
//----------------------------------
DWORD_TYPE(DYN_LOADER_START_DATA1)
//----------------------------------
_RO_dwImageBase: DWORD_TYPE(0xCCCCCCCC)
_RO_dwOrgEntryPoint:
DWORD_TYPE(0xCCCCCCCC)
//----------------------------------
DWORD_TYPE(DYN_LOADER_END_MAGIC)
//----------------------------------
}
}
6 Build an Import Table and Reconstruct the Original Import
Table
6 ������������ع�ԭ���ĵ����
To use the Windows dynamic link library (DLL) in Windows application programming,
there are two ways:
Ϊ����WindowsӦ�ó�����ʹ��Windows dynamic link library (DLL)�������������ɹ�ѡ��
- Using Windows
libraries by additional dependencies:
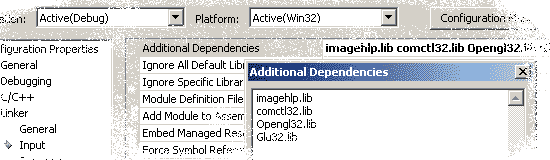
- Using Windows
dynamic link libraries in run-time:
��
// DLL function signature
��
typedef HGLOBAL (*importFunction_GlobalAlloc)(UINT, SIZE_T);
��
...
��
importFunction_GlobalAlloc
__GlobalAlloc;
��
��
// Load DLL file
��
HINSTANCE hinstLib
= LoadLibrary("Kernel32.dll");
��
if (hinstLib == NULL)
��
{
��
// Error - unable to load DLL
��
}
��
��
// Get function pointer
��
__GlobalAlloc =
��
(importFunction_GlobalAlloc)GetProcAddress(hinstLib,
��
"GlobalAlloc");
��
if (addNumbers == NULL)
��
{
��
// Error - unable to find DLL function
��
}
��
FreeLibrary(hinstLib);
When you make a Windows application project, the linker
includes at least kernel32.dll in the base dependencies of your project.
Without LoadLibrary() and GetProcAddress() of Kernel32.dll, we can not
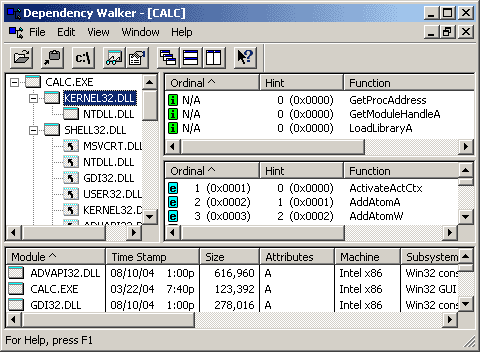
load a DLL in run-time. The dependencies information is stored in the import
table section. By Dependency Walker, it is not so difficult to observe the DLL
module and the functions which are imported into a PE file.
����make Windows Ӧ�ó�����Ŀʱ������������Ŀ�Ļ���������ϵ�����ٻ����kernel32.dll��û��kernel32.dll��LoadLibrary()��GetProcAddress()�����Dz�����run-time����DLL��������ϵ����Ϣ�����ڵ���������ͨ��Dependency Walker�����Կ���������PE�ļ���DLLģ��ͺ�����
We attempt to establish our custom import table to conduct
our project. Furthermore, we have to fix up the original import table at
the end in order to run the real code of the program.
�����跨�������Ƶĵ���������������Լ�����Ŀ�����⣬Ϊ�����г��������Ĵ��룬���DZ�����ԭʼ�ĵ������
6.1 Construct the
Client Import Table
6.1 ����ͻ��˵����
I strongly advise you to read the section 6.4 of the Microsoft Portable Executable and the Common Object File Format
Specification document. This section contains the principal information
to comprehend the import table performance.
��ǿ�ҽ������Ķ�Microsoft Portable Executable and the Common Object File Format
Specification�ĵ���6.4�ڡ���һ�ڰ���������ʵ�ֵ���Ҫ��Ϣ��
The import table data is accessible by a second data directory
of the optional header from PE headers, so you can access it by using the
following code:
��PEͷ��optional header��second data directory���Է��ʵ�������ݣ���ˣ������������Ĵ����������
DWORD dwVirtualAddress = image_nt_headers->
OptionalHeader.DataDirectory[IMAGE_DIRECTORY_ENTRY_IMPORT].VirtualAddress;
DWORD dwSize = image_nt_headers->
OptionalHeader.DataDirectory[IMAGE_DIRECTORY_ENTRY_IMPORT].Size;
The VirtualAddress refers to structures by IMAGE_IMPORT_DESCRIPTOR. This structure contains the pointer to the imported DLL
name and the relative virtual address of the first thunk.
VirtualAddressͨ��IMAGE_IMPORT_DESCRIPTORָ��ṹ������ṹ����ָ�����DLL����first thunk ��RVA��ָ�롣
typedef struct _IMAGE_IMPORT_DESCRIPTOR {
union {
DWORD
Characteristics;
DWORD
OriginalFirstThunk;
};
DWORD TimeDateStamp;
DWORD ForwarderChain;
DWORD Name; // the imported DLL name
DWORD FirstThunk;
// the relative virtual address of the first
thunk
} IMAGE_IMPORT_DESCRIPTOR, *PIMAGE_IMPORT_DESCRIPTOR;
When a program is running, the Windows task manager sets
the thunks by the virtual address of the function. The virtual address is
found by the name of the function. At first, the thunks hold the relative
virtual address of the function name, Table 5;
during execution, they are fixed up by the virtual address of the functions,
Table 6.
����������ʱ��Windows���������ͨ��������virtual address����thunks��ͨ�����������Է���virtual address�����ȣ�thunks���к�������RVA����Table 5����ִ���ڼ䣬ͨ��������virtual address�����ǡ�
Table 5 - The Import
Table in file image
| IMAGE_IMPORT_ |
OriginalFirstThunk |
|
|
||
| TimeDateStamp |
|||||
| ForwarderChain |
|||||
| Name_RVA |
------> |
"kernel32.dll",0 |
|||
| FirstThunk_RVA |
------> |
proc_1_name_RVA |
------> |
0,0,"LoadLibraryA",0 |
|
| |
proc_2_name_RVA |
------> |
0,0,"GetProcAddress",0 |
||
| proc_3_name_RVA |
------> |
0,0,"GetModuleHandleA",0 |
|||
| ... |
|
|
|||
| IMAGE_IMPORT_ |
|
||||
| ... |
|
||||
| IMAGE_IMPORT_ |
|
||||
Table 6 - The Import
Table in virtual memory
| IMAGE_IMPORT_DESCRIPTOR[0] |
OriginalFirstThunk |
|
|
| TimeDateStamp |
|||
| ForwarderChain |
|||
| Name_RVA |
------> |
"kernel32.dll",0 |
|
| FirstThunk_RVA |
------> |
proc_1_VA |
|
| |
proc_2_VA |
||
| proc_3_VA |
|||
| ... |
|||
| IMAGE_IMPORT_DESCRIPTOR[1] |
|
||
| ... |
|
||
| IMAGE_IMPORT_DESCRIPTOR[n] |
|
||
We want to make a simple import table to import LoadLibrary(), and GetProcAddress() from Kernel32.dll. We need these two essential API functions to cover
other API functions in run-time. The following assembly code shows how easily
we can reach our solution:
����������һ���ĵ��������Kernel32.dll�е���LoadLibrary()��GetProcAddress()��������Ҫ��run-time��������������API�����ܰ���������API����������Ļ�������ʾ���ǿ��Ժ�����������
00000000 ; OriginalFirstThunk
00
00
After running...
�����к�...
00000000 ; OriginalFirstThunk
00
00
00
I have prepared a class library to make every import table
by using a client string table. The CITMaker class library in itmaker.h,
it will build an import table by sz_IT_EXE_strings and also the relative virtual address of
the import table.
������һ����⣬�������ÿͻ����ַ���������ȫ���ĵ������itmaker.h��CITMaker��⣬ͨ��sz_IT_EXE_strings�͵������RVA�����������
static const char *sz_IT_EXE_strings[]=
{
"Kernel32.dll",
"LoadLibraryA",
"GetProcAddress",
0,,
0,
};
We subsequently employ this class library to establish an
import table to support DLLs and OCXs, so this is a general library to present
all possible import tables easily. The next step is clarified in the following
code.
��������������⽨��һ�����������֧��DLL��OCX����ˣ�����һ��ͨ�õ�library�����Ժ����ij��ֿ��ܵĵ����������Ĵ�������˽������IJ��衣
CITMaker *ImportTableMaker = new CITMaker( IMPORT_TABLE_EXE
);
...
pimage_section_header=AddNewSection(
".xxx", dwNewSectionSize );
// build import table by the current
virtual address
ImportTableMaker->Build
( pimage_section_header->VirtualAddress );
memcpy( pNewSection, ImportTableMaker->pMem,
ImportTableMaker->dwSize );
...
memcpy( image_section[image_nt_headers->FileHeader.NumberOfSections-1],
pNewSection,
dwNewSectionSize );
...
image_nt_headers->OptionalHeader.
DataDirectory[IMAGE_DIRECTORY_ENTRY_IMPORT].VirtualAddress
=
pimage_section_header->VirtualAddress;
image_nt_headers->OptionalHeader.
DataDirectory[IMAGE_DIRECTORY_ENTRY_IMPORT].Size
=
ImportTableMaker->dwSize;
...
delete ImportTableMaker;
The import table is copied at the beginning of the new section,
and the relevant data directory is adjusted to the relative virtual address
of the new section and the size of the new import table
����������Ƶ������εĿ�ͷ�����������ε�RVA���µ�����Ĵ�С������Ӧ������Ŀ¼��
6.2 Using other API
functions in run-time
6.2 ��run-timeʹ��������API����
At this time, we can load other DLLs and find the process
address of other functions by using LoadLibrary() and GetProcAddress():
��һ�Σ����ǿ���ͨ��LoadLibrary()��GetProcAddress()����������DLL�����ҳ����������Ľ��̵�ַ��
lea edi, @"Kernel32.dll"
//-------------------
push edi
mov eax,offset _p_LoadLibrary
call [ebp+eax] //LoadLibrary(lpLibFileName);
//-------------------
mov esi,eax
// esi -> hModule
lea edi, @"GetModuleHandleA"
//-------------------
push edi
push esi
mov eax,offset _p_GetProcAddress
call [ebp+eax] //GetModuleHandle=GetProcAddress(hModule, lpProcName);
//--------------------
I want to have a complete imported function table similar
in performance done in a real EXE file. If you look inside a PE file, you
will discover that an API call is done by an indirection jump through the
virtual address of the API function:
������һ������ʵ��EXE�ļ����Ƶ������ĵ��뺯�����������鿴PE�ļ����ڲ����㽫����API������ʵ��ͨ��API������virtual address �ļ��ת����ʵ�ֵģ�
JMP DWORD PTR [XXXXXXXX]
...
...
...
...
It makes it easy to expand the other part of our project
by this performance, so we construct two data tables: first for API virtual
addresses, and the second for the JMP [XXXXXXXX].
��ͨ������ʵ��ʹ����������չ�����Ŀ���������֣���ˣ����ǹ����������ݱ�����һ������API virtual addresses���ڶ�������JMP [XXXXXXXX]��
#define __jmp_api
byte_type(0xFF) byte_type(0x25)
__asm
{
...
//----------------------------------------------------------------
_p_GetModuleHandle:
dword_type(0xCCCCCCCC)
_p_VirtualProtect:
dword_type(0xCCCCCCCC)
_p_GetModuleFileName:
dword_type(0xCCCCCCCC)
_p_CreateFile:
dword_type(0xCCCCCCCC)
_p_GlobalAlloc:
dword_type(0xCCCCCCCC)
//----------------------------------------------------------------
_jmp_GetModuleHandle:
__jmp_api dword_type(0xCCCCCCCC)
_jmp_VirtualProtect:
__jmp_api dword_type(0xCCCCCCCC)
_jmp_GetModuleFileName: __jmp_api
dword_type(0xCCCCCCCC)
_jmp_CreateFile:
__jmp_api dword_type(0xCCCCCCCC)
_jmp_GlobalAlloc:
__jmp_api dword_type(0xCCCCCCCC)
//----------------------------------------------------------------
...
}
In the succeeding code, we has
concluded our ambition to install a custom internal import table! (We can
not call it import table.)
�����Ĵ����У�����Ұ�IJ������밲װһ�����Ƶ��ڲ�������������Dz��ܰ�����Ϊ���������
...
lea
edi,[ebp+_p_szKernel32]
lea
ebx,[ebp+_p_GetModuleHandle]
lea
ecx,[ebp+_jmp_GetModuleHandle]
add
ecx,02h
_api_get_lib_address_loop:
push ecx
push edi
mov eax,offset _p_LoadLibrary
call [ebp+eax] //LoadLibrary(lpLibFileName);
pop ecx
mov esi,eax // esi ->
hModule
push edi
call __strlen
add esp,04h
add edi,eax
_api_get_proc_address_loop:
push ecx
push edi
push esi
mov eax,offset _p_GetProcAddress
call [ebp+eax]//GetModuleHandle=GetProcAddress(hModule,
lpProcName);
pop ecx
mov [ebx],eax
mov [ecx],ebx // JMP DWORD PTR [XXXXXXXX]
add ebx,04h
add ecx,06h
push edi
call __strlen
add esp,04h
add edi,eax
mov al,byte ptr [edi]
test al,al
jnz _api_get_proc_address_loop
inc edi
mov al,byte ptr [edi]
test
al,al
jnz
_api_get_lib_address_loop
...
6.3 Fix up the Original
Import Table
6.3 ��ԭʼ�ĵ����
In order to run the program again, we should fix up the
thunks of the actual import table, otherwise we
have a corrupted target PE file. Our code must correct all of the thunks
the same as Table 5
to Table
6. Once more, LoadLibrary() and GetProcAddress() aid us in our effort to reach our intention.
Ϊ���ٴ����������������Ӧ���������ĵ������thunks���������ǵ�PE�ļ�������ȫ�����ǵĴ������������е�thunks������Table 5��Table 6һ����LoadLibrary()��GetProcAddress()���ٴΰ������ǡ�
...
mov
ebx,[ebp+_p_dwImportVirtualAddress]
test
ebx,ebx
jz
_it_fixup_end
mov
esi,[ebp+_p_dwImageBase]
add
ebx,esi
// dwImageBase + dwImportVirtualAddress
_it_fixup_get_lib_address_loop:
mov eax,[ebx+00Ch] //
image_import_descriptor.Name
test eax,eax
jz _it_fixup_end
mov ecx,[ebx+010h] //
image_import_descriptor.FirstThunk
add ecx,esi
mov [ebp+_p_dwThunk],ecx // dwThunk
mov ecx,[ebx]
// image_import_descriptor.Characteristics
test ecx,ecx
jnz _it_fixup_table
mov ecx,[ebx+010h]
_it_fixup_table:
add ecx,esi
mov [ebp+_p_dwHintName],ecx // dwHintName
add eax,esi //
image_import_descriptor.Name + dwImageBase = ModuleName
push eax // lpLibFileName
mov eax,offset _p_LoadLibrary
call [ebp+eax]
// LoadLibrary(lpLibFileName);
test eax,eax
jz _it_fixup_end
mov edi,eax
_it_fixup_get_proc_address_loop:
mov ecx,[ebp+_p_dwHintName] // dwHintName
mov edx,[ecx]
// image_thunk_data.Ordinal
test edx,edx
jz _it_fixup_next_module
test edx,080000000h // .IF( import
by ordinal )
jz _it_fixup_by_name
and edx,07FFFFFFFh // get ordinal
jmp _it_fixup_get_addr
_it_fixup_by_name:
add edx,esi // image_thunk_data.Ordinal + dwImageBase
= OrdinalName
inc edx
inc edx
// OrdinalName.Name
_it_fixup_get_addr:
push edx //lpProcName
push edi
// hModule
mov eax,offset _p_GetProcAddress
call [ebp+eax] // GetProcAddress(hModule,
lpProcName);
mov ecx,[ebp+_p_dwThunk] // dwThunk
mov [ecx],eax // correction the thunk
// dwThunk => next dwThunk
add dword ptr [ebp+_p_dwThunk], 004h
// dwHintName => next dwHintName
add dword ptr [ebp+_p_dwHintName],004h
jmp _it_fixup_get_proc_address_loop
_it_fixup_next_module:
add ebx,014h // sizeof(IMAGE_IMPORT_DESCRIPTOR)
jmp
_it_fixup_get_lib_address_loop
_it_fixup_end:
...
7 ֧��DLL��OCX
Now, we intend to include the dynamic link library (DLL) and OLE-ActiveX Control
in our PE builder project. Supporting them is very easy if we pay attention
to the two time arrival into the Offset of Entry Point, the relocation table
implementation, and the client import table.
���ڣ��Ҵ��������ǵ�PE builder��Ŀ�а���dynamic link library (DLL)��OLE-ActiveX Control���������ע��������OEP���ض�λ��ʵ�֣��Ϳͻ��˵����������ʱ����֧�����ǽ��Ƿdz��������顣
The Offset of Entry Point of a DLL file or an OCX file is
touched by the main program atleast twice:
���������������λ�������DLL�ļ���OCX�ļ���OEP��
- Constructor:
- ���캯����
When a DLL is loaded by LoadLibrary(), or an OCX is registered by using LoadLibrary() and GetProcAddress() through calling DllRegisterServer(), the first of the OEP arrival is
done.
��ͨ��LoadLibrary()����DLL����ͨ������DllRegisterServer()��LoadLibrary()��GetProcAddress()ע��OCXʱ������һ������OEP��
hinstDLL = LoadLibrary( "test1.dll" );
hinstOCX = LoadLibrary( "test1.ocx" );
_DllRegisterServer = GetProcAddress(
hinstOCX, "DllRegisterServer" );
_DllRegisterServer();
// ocx register
- Destructor:
- ����������
When the main program frees the library usage
by FreeLibrary(), the second OEP arrival
happens.
��������ͨ��FreeLibrary()�ͷ�libraryʹ��ʱ����ڶ�������OEP��
FreeLibrary( hinstDLL );
FreeLibrary( hinstOCX );
To perform this, I have employed a trick,
that causes in the second time again, the instruction pointer (EIP)
traveling towards the original OEP by the structured exception handler.
Ϊ������Щ������ʩ���С�����ڵڶ�����ͨ��SEH�ٴδ�ʹEIP����ԭʼ��OEP��
_main_0:
pushad // save the registers context in
stack
call
_main_1
_main_1:
pop
ebp
sub
ebp,offset _main_1 // get base ebp
//---------------- support
dll, ocx -----------------
_support_dll_0:
jmp
_support_dll_1 // nop; nop; // << trick // in the second time OEP
jmp _support_dll_2
_support_dll_1:
//----------------------------------------------------
...
//---------------- support
dll, ocx 1
---------------
mov
edi,[ebp+_p_dwImageBase]
add
edi,[edi+03Ch]// edi -> IMAGE_NT_HEADERS
mov
ax,word ptr [edi+016h]// edi -> image_nt_headers->FileHeader.Characteristics
test
ax,IMAGE_FILE_DLL
jz
_support_dll_2
mov ax, 9090h // << trick
mov word ptr [ebp+_support_dll_0],ax
_support_dll_2:
//----------------------------------------------------
...
into
OEP by SEH ...
I hope you have caught the trick in the preceding code,
but this is not all of it, we have problem in ImageBase, when the library has
been loaded in different image bases by the main program. We should write
some code to find the real image base and store it to use forward.
��ϣ��������ǰ��Ĵ����з������С���ɣ����Ⲣ��������ȫ�������������library���ص���ͬ��image bases��������ImageBase������⡣Ϊ��ʹ��ת��������Ӧ��дһЩ���룬�ҳ�������image base�������DZ���������
mov eax,[esp+24h] // the real imagebase
mov
ebx,[esp+30h] // oep
cmp
eax,ebx
ja
_no_dll_pe_file_0
cmp word ptr [eax],IMAGE_DOS_SIGNATURE
jne _no_dll_pe_file_0
mov [ebp+_p_dwImageBase],eax
_no_dll_pe_file_0:
This code finds the real image base by investigating the
stack information. By using the real image base and the formal image base,
we should correct all memory calls inside the image program!! Don't be afraid,
it will be done simply by the relocating the table information.
��δ���ͨ��ջ��Ϣ�ҳ�������image
base��ͨ��ʹ��������image
base����ʽ�ϵ�image
base�����ǿ��Ծ�������ӳ�������е��ڴ���ã������õ��ģ�ͨ���ض�λ������Ϣ���Ժ�����������
7.2 Implement Relocation
Table
7.2 ʵ���ض�λ��
To understand the relocation table better, you can take
a look at the section 6.6 of Microsoft Portable Executable and Common Object File Format Specification
document. The relocation table contains many packages to relocate the information
related to the virtual address inside the virtual memory image. Each package
comprise of a 8 bytes header to exhibit the base
virtual address and the number of data, demonstrated by the IMAGE_BASE_RELOCATION data structure.
Ϊ�˸��õ������ض�λ����������ж�Microsoft Portable Executable and Common Object File Format Specification�ĵ���6.6�ڡ��ض�λ�����������������ڴ�ӳ���ڲ���virtual address ��������ض�λ��Ϣ��packages��ÿ��package��չʾbase virtual address��8�ֽ�ͷ����һЩ������ɡ�IMAGE_BASE_RELOCATION ���ݽṹ���Ƿ�����
typedef struct _IMAGE_BASE_RELOCATION {
DWORD VirtualAddress;
DWORD SizeOfBlock;
} IMAGE_BASE_RELOCATION, *PIMAGE_BASE_RELOCATION;
Table 7 - The Relocation
Table
| Block[1] |
VirtualAddress |
|||
| SizeOfBlock |
||||
| type:4 |
offset:12 |
type:4 |
offset:12 |
|
| type:4 |
offset:12 |
type:4 |
offset:12 |
|
| type:4 |
offset:12 |
type:4 |
offset:12 |
|
| ... |
... |
... |
... |
|
| type:4 |
offset:12 |
00 |
00 |
|
| Block[2] |
VirtualAddress |
|||
| SizeOfBlock |
||||
| type:4 |
offset:12 |
type:4 |
offset:12 |
|
| type:4 |
offset:12 |
type:4 |
offset:12 |
|
| type:4 |
offset:12 |
type:4 |
offset:12 |
|
| ... |
... |
... |
... |
|
| type:4 |
offset:12 |
00 |
00 |
|
| ... |
... |
|||
| Block[n] |
VirtualAddress |
|||
| SizeOfBlock |
||||
| type:4 |
offset:12 |
type:4 |
offset:12 |
|
| type:4 |
offset:12 |
type:4 |
offset:12 |
|
| type:4 |
offset:12 |
type:4 |
offset:12 |
|
| ... |
... |
... |
... |
|
| type:4 |
offset:12 |
00 |
00 |
|
Table 7
illustrates the main idea of the relocation table. Furthermore, you can
upload a DLL or an OCX file in OllyDbg
to observe the relocation table, the ".reloc" section through
Memory map window. By the way, we find the position of the relocation
table by using the following code in our project:
Table 7ͼ���ض�λ������Ҫ������⣬�����DLL��OCX����OllyDbg��ͨ��Memory map window��".reloc"���ι۲��ض�λ����˳��˵һ�£���������Ŀ��ͨ������Ĵ��뷢���ض�λ����λ�ã�
DWORD dwVirtualAddress = image_nt_headers->
OptionalHeader.DataDirectory[IMAGE_DIRECTORY_ENTRY_BASERELOC].
VirtualAddress;
DWORD dwSize = image_nt_headers->
OptionalHeader.DataDirectory[IMAGE_DIRECTORY_ENTRY_BASERELOC].Size;
By OllyDbg, we have the same as the following for the ".reloc"
section, by using the Long Hex viewer mode. In this example, the base virtual
address is 0x1000 and the size of the block
is 0x184.
��OllyDbg�ͨ��ʹ��Long Hex viewerģʽ�����ǵ�".reloc"�����������һ��������������base virtual address��0x1000�����С��0x184��
008E1000 : 00001000 00000184 30163000 30403028
008E1010 : 30683054
008E1020 : 30E030DC 30E830E4
008E1030 : 3120310D
008E1040 : 31D031CC
008E1050 :
008E1060 :
It relocates the data in the subsequent virtual addresses:
������virtual addresses�����ض�λ���ݣ�
0x1000 + 0x0000 = 0x1000
0x1000 + 0x0016 = 0x1016
0x1000 + 0x0028 = 0x1028
0x1000 + 0x0040 = 0x1040
0x1000 + 0x0054 = 0x1054
...
Each package performs the relocation by using consecutive
4 bytes form its internal information. The first byte refers to the type
of relocation and the next three bytes are the offset which must be used
with the base virtual address and the image base to correct the image information.
ÿ��packageͨ��ʹ�����������ڲ���Ϣ��������4�ֽ���ʵ���ض�λ����һ���ֽ������ض�λ�����ͣ��������������ֽ��DZ�����base virtual address��image baseһ��ʹ�õ�ƫ���������ھ���ӳ����Ϣ��
| type |
offset |
||
| 03 |
00 |
00 |
00 |
What is the type
The type can be one of the following values:
���Ϳ��������ij��ֵ��
- IMAGE_REL_BASED_ABSOLUTE
(0): no effect.
- IMAGE_REL_BASED_HIGH
(1): relocate
by the high 16 bytes of the base virtual address and the offset.
- IMAGE_REL_BASED_LOW
(2): relocate
by the low 16 bytes of the base virtual address and the offset.
- IMAGE_REL_BASED_HIGHLOW
(3): relocate
by the base virtual address and the offset.
What is done in the relocation?
By relocation, some values inside the virtual memory are
corrected according to the current image base by the ".reloc"
section packages.
ͨ���ض�λ��ͨ��".reloc"����packages�����յ�ǰ��image
base�����������ڴ��ڵ�ijЩֵ��
| delta_ImageBase = current_ImageBase - image_nt_headers->OptionalHeader.ImageBase |
mem[ current_ImageBase + 0x1000 ] =
mem[ current_ImageBase + 0x1000 ] + delta_ImageBase
;
mem[ current_ImageBase + 0x1016 ] =
mem[ current_ImageBase + 0x1016 ] + delta_ImageBase
;
mem[ current_ImageBase + 0x1028 ] =
mem[ current_ImageBase + 0x1028 ] + delta_ImageBase
;
mem[ current_ImageBase + 0x1040 ] =
mem[ current_ImageBase + 0x1040 ] + delta_ImageBase
;
mem[ current_ImageBase + 0x1054 ] =
mem[ current_ImageBase + 0x1054 ] + delta_ImageBase ;
...
I have employed the following code from Morphine packer
to implement the relocation.
Ϊ��ʵ���ض�λ����ʹ��������Morphine packer�Ĵ��룬������ʾ��
...
_reloc_fixup:
mov
eax,[ebp+_p_dwImageBase]
mov
edx,eax
mov
ebx,eax
add
ebx,[ebx+3Ch] // edi -> IMAGE_NT_HEADERS
mov
ebx,[ebx+034h]// edx ->image_nt_headers->OptionalHeader.ImageBase
sub edx,ebx // edx ->
reloc_correction // delta_ImageBase
je
_reloc_fixup_end
mov
ebx,[ebp+_p_dwRelocationVirtualAddress]
test
ebx,ebx
jz
_reloc_fixup_end
add
ebx,eax
_reloc_fixup_block:
mov eax,[ebx+004h]
//ImageBaseRelocation.SizeOfBlock
test
eax,eax
jz
_reloc_fixup_end
lea
ecx,[eax-008h]
shr
ecx,001h
lea
edi,[ebx+008h]
_reloc_fixup_do_entry:
movzx eax,word ptr [edi]//Entry
push edx
mov edx,eax
shr eax,00Ch
//Type = Entry >> 12
mov esi,[ebp+_p_dwImageBase]//ImageBase
and dx,00FFFh
add esi,[ebx]
add esi,edx
pop edx
_reloc_fixup_HIGH:
// IMAGE_REL_BASED_HIGH
dec
eax
jnz _reloc_fixup_LOW
mov eax,edx
shr eax,010h //HIWORD(Delta)
jmp _reloc_fixup_LOW_fixup
_reloc_fixup_LOW:
// IMAGE_REL_BASED_LOW
dec eax
jnz _reloc_fixup_HIGHLOW
movzx eax,dx
//LOWORD(Delta)
_reloc_fixup_LOW_fixup:
add word ptr [esi],ax// mem[x] = mem[x] + delta_ImageBase
jmp _reloc_fixup_next_entry
_reloc_fixup_HIGHLOW:
// IMAGE_REL_BASED_HIGHLOW
dec eax
jnz _reloc_fixup_next_entry
add [esi],edx
// mem[x] = mem[x] + delta_ImageBase
_reloc_fixup_next_entry:
inc edi
inc edi
//Entry++
loop _reloc_fixup_do_entry
_reloc_fixup_next_base:
add
ebx,[ebx+004h]
jmp
_reloc_fixup_block
_reloc_fixup_end:
...
7.3 Build a Special Import
table
7.3 ��������ĵ����
In order to support the OLE-ActiveX Control
registration, we should present an appropriate import table to our target
OCX and DLL file.
Ϊ��֧��OLE-ActiveX Controlע�ᣬ����Ӧ������һ���ʵ��ĵ������Ŀ��OCX��DLL�ļ���
Therefore, I have established an import table by the following
string:
��ˣ���ͨ��������ַ��������������
const char *sz_IT_OCX_strings[]=
{
"Kernel32.dll",
"LoadLibraryA",
"GetProcAddress",
"GetModuleHandleA",
0,
"User32.dll",
"GetKeyboardType",
"WindowFromPoint",
0,
"AdvApi32.dll",
"RegQueryValueExA",
"RegSetValueExA",
"StartServiceA",
0,
"Oleaut32.dll",
"SysFreeString",
"CreateErrorInfo",
"SafeArrayPtrOfIndex",
0,
"Gdi32.dll",
"UnrealizeObject",
0,
"Ole32.dll",
"CreateStreamOnHGlobal",
"IsEqualGUID",
0,
"ComCtl32.dll",
"ImageList_SetIconSize",
0,
0,
};
Without these API functions, the library can not be loaded,
and moreover the DllregisterServer()
and DllUregisterServer() will not operate. In CPECryptor::CryptFile, I have distinguished between EXE files and DLL files in
the initialization of the new import table object during creation:
û����ЩAPI�����������ܼ���library�����⣬DllregisterServer()��DllUregisterServer()Ҳ���ܹ�������CPECryptor::CryptFile������γ��ڼ䣬���µ���������ij�ʼ������������EXE�ļ���DLL�ļ���
if(( image_nt_headers->FileHeader.Characteristics
& IMAGE_FILE_DLL ) == IMAGE_FILE_DLL
)
{
ImportTableMaker = new CITMaker(
IMPORT_TABLE_OCX );
}
else
{
ImportTableMaker = new CITMaker(
IMPORT_TABLE_EXE );
}
8 Preserve the Thread Local Storage
8 ����TLS
By using Thread Local Storage (TLS), a program is able to
execute a multithreaded process, this performance
mostly is used by Borland
linkers: Delphi and C++
Builder. When you pack a PE file, you should take care to keep clean
the TLS, otherwise, your packer will not support Borland Delphi and C++
Builder linked EXE files. To comprehend TLS, I refer you to section 6.7
of the Microsoft Portable Executable and Common Object File Format Specification
document, you can observe the TLS structure by
IMAGE_TLS_DIRECTORY
ͨ��ʹ��TLS��Thread Local Storage�����������ִ�ж��̣߳���Ҫ��Borland��������Delphi��C++
Builderʹ�����ǡ�������PE�ļ�ʱ��Ӧ����ϸ����TLS����࣬�������packer����֧��Borland Delphi��C++ Builder���ӵ�EXE�ļ���Ϊ������TLS���ҽ������Ķ�Microsoft Portable Executable and Common Object File Format Specification�ĵ���6.7�ڣ��������winnt.h�е�IMAGE_TLS_DIRECTORY32�۲�TLS�ṹ��
typedef struct _IMAGE_TLS_DIRECTORY32 {
DWORD StartAddressOfRawData;
DWORD EndAddressOfRawData;
DWORD AddressOfIndex;
DWORD AddressOfCallBacks;
DWORD SizeOfZeroFill;
DWORD Characteristics;
} IMAGE_TLS_DIRECTORY32, * PIMAGE_TLS_DIRECTORY32;
To keep safe the TLS directory, I have copied it in a special
place inside the loader:
Ϊ�˱���TLSĿ¼�İ�ȫ���Ұ������Ƶ�loadre�������ĵط���
...
_tls_dwStartAddressOfRawData: dword_type(0xCCCCCCCC)
_tls_dwEndAddressOfRawData: dword_type(0xCCCCCCCC)
_tls_dwAddressOfIndex: dword_type(0xCCCCCCCC)
_tls_dwAddressOfCallBacks: dword_type(0xCCCCCCCC)
_tls_dwSizeOfZeroFill:
dword_type(0xCCCCCCCC)
_tls_dwCharacteristics: dword_type(0xCCCCCCCC)
...
It is necessary to correct the TLS directory entry in the
Optional Header:
�б�Ҫ��Optional Header�����TLSĿ¼����ڣ�
if(image_nt_headers->
OptionalHeader.DataDirectory[IMAGE_DIRECTORY_ENTRY_TLS].
VirtualAddress!=0)
{
memcpy(&pDataTable->image_tls_directory,
image_tls_directory,
sizeof(IMAGE_TLS_DIRECTORY32));
dwOffset=DWORD(pData1)-DWORD(pNewSection);
dwOffset+=sizeof(t_DATA_1)-sizeof(IMAGE_TLS_DIRECTORY32);
image_nt_headers->
OptionalHeader.DataDirectory[IMAGE_DIRECTORY_ENTRY_TLS].
VirtualAddress=dwVirtualAddress
+ dwOffset;
}
9 ע����Ĵ���
We are ready to place our code inside the new section. Our
code is a "Hello World!" message by MessageBox() from user32.dll.
�����������ǵĴ����������������ǵĴ�������user32.dll��MessageBox()��ʾ"Hello World!"��Ϣ��
...
push MB_OK | MB_ICONINFORMATION
lea eax,[ebp+_p_szCaption]
push eax
lea eax,[ebp+_p_szText]
push eax
push NULL
call _jmp_MessageBox
// MessageBox(NULL,
szText, szCaption, MB_OK | MB_ICONINFORMATION) ;
...
10 Conclusion
10 ����
By this article, you have perceived how easily we can inject
code to a portable executable file. You can complete the code by using the
source of other packers, create a packer in the same way as Yoda's Protector, and
make your packer undetectable by mixing up with Morphine source code.
I hope that you have enjoyed this brief discussion of one part of the reverse
engineering field. See you again in the next discussion!
ͨ����ƪ���£��㿴������PE�ļ���ע����벢���ѡ������������packers��Դ����ɱ��룬��Yoda's Protector���Ƶķ�ʽ����packer��ͨ����MorphineԴ����ʹ���packer����⡣��ϣ������ϲ����ƪ���£������ٴμ����㣡
Ashkbiz Danehkar
|
|
Click here
to view Ashkbiz Danehkar's online profile. |
|
Other popular articles:
|