翻译了篇文章。觉得这文章还不错。本人第一次翻译东西,错误地方请大家指教
文中用到的工具下载地址:
TibiaBot NG 3.6
http://forums.tibiabot.com/setup-3.6.exe
tibia76
http://download.tibia.com/tibia76.exe
Unpacking Armadillo 3.xx DLL
Whiterat // ICUTools Needed 需要工具
OllyDBG
LordPE
Imprec
ReloXTarget
Target TibiaBot NG 3.4
Homepage http://www.TibiaBot.com
PEiD Armadillo 2.51 - 3.xx DLL Stub -> Silicon Realms Toolworks
目标
目标 TibiaBot NG 3.4
主页 http://www.TibiaBot.com
PEiD Armadillo 2.51 - 3.xx DLL Stub -> Silicon Realms Toolworks
Introduction
In this tutorial we are going to have a go at unpacking an Armadillo 3.xx DLL.
Usually this is quite an easy task, but this program seems to mess up the relocation table...
SO LETS FIX IT
介绍
在这篇教程中我们将要着手于一个 Armadillo 3.xx DLL.
通常这是十分简单的任务, 但是这个程序似乎陷入了重定位表的困境中...
所以让我们来修复她Start
开始
Fireup OllyDBG, and you should land somewhere like this:
打开 OD ,然后你向这样停在某处:

Now make sure that IsDebuggerPresent has been hidden and that all exceptions are ignored.
Now lets set a break point on VirtualProtect:
现在确定 IsDebuggerPresent 已经隐藏同时忽略所有异常.
我们设置一个 VirtualProtect 断点:

Then press Shift+F9 to run until it breaks.
It will break 5 or 6 times and will look like this:
然后按 Shift+F9 直到程序中断
她将中断 5 或 6 次然后看到堆栈如下提示:

We are looking for a call to VirtualProtect from a Dynamicly Allocated area, this is called from 00A2C892
Which is in .text so this isnt the one we want.
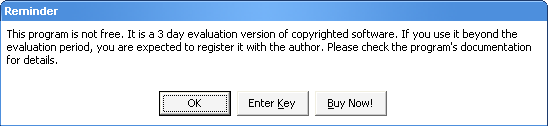
After we have passed all the VirtualProtect's we dont want you will see the Armadillo NAG Screen:
我们寻找一个来自动态分配区的 VirtualProtect 调用,这个 call 调用来自于 00A2C892
这是哪的?.text 段的,所以这不是我们想要的.
在我们通过了所有的 VirtualProtect 我们不想你看到 Armadillo NAG 窗口
After pressing OK we should break on another VirtualProtect:
当按下 OK 后我们会中断在另一个 VirtualProtect:
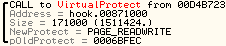
Notice this is called from a Dynamic Area? So This is the call we were looking for!
Press Ctrl+F9 (NOT SHIFT) then Shift+F7 to step out of the call back into the code.
Then goto the top of the section and search for "Push 100", search until you find this:
注意这个调用是否来自一个动态区?所以这就是我们要找的 call !
按 Ctrl+F9 (不是 SHIFT) 然后 Shift+F7 步出回调到代码。
然后来到段顶并查找 Push 100 直到找到这些:
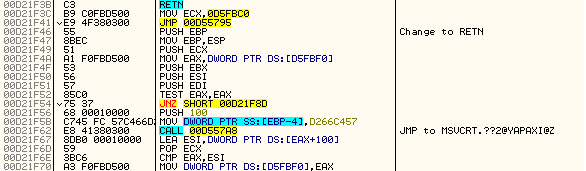
In order for the IAT to be clean and useable you must change the PUSH EBP into RETN
Now remove the Breakpoint on VirtualProtect and place one on CreateThread
When it breaks open the memory map (Alt+M) and place Break-On-Access for CODE section:
你必须修改 PUSH EBP 为 RETN 来跳过 ARM 加密 IAT
现在清除 VirtualProtect 断点,然后下另一个 CreateThread 断点
当中断后 Alt+M 打开内存映射窗口,然后在代码段下 "在访问上设置中断" :
Now remove the breakpoint on CreateThread and then press Shift+F9
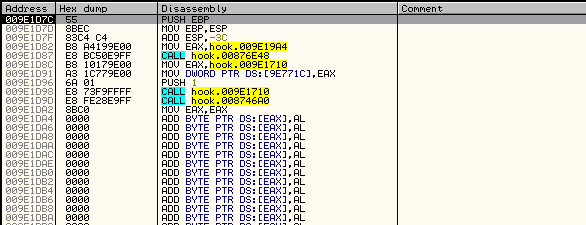
You will now break on the OEP:
现在清除 CreateThread 然后按 Shift+F9
你将中断在 OEP:
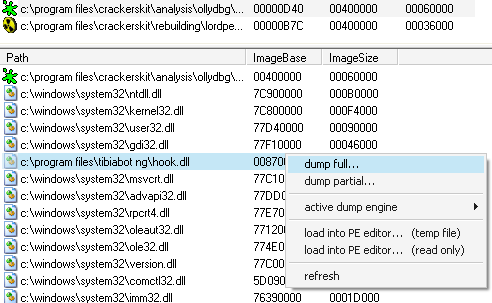
Now we have to Dump with LordPE, select LoadDLL then right click "Hook.dll" and select Full Dump
现在我们用 LoadPE 转存,选择 LoadDLL 然后右键单击 Hook.dll 选择“完整转存”
After Dumping fireup Imprec, select LoadDLL again then click PickDLL and choose Hook.dll
转存后打开 Import REC 再次选择 LoadDLL 然后”选取 DLL“ 并选择 Hook.dll
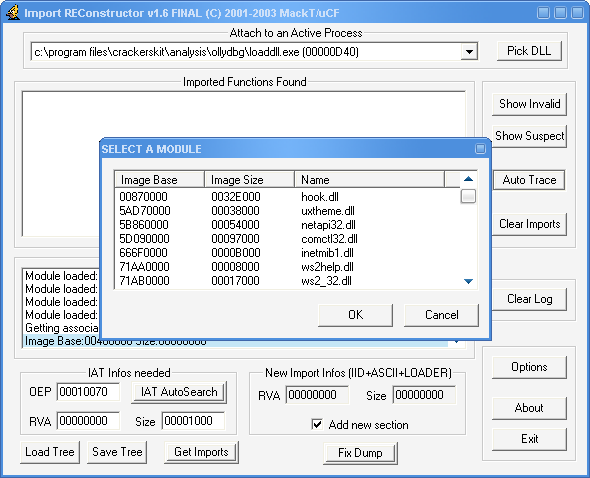
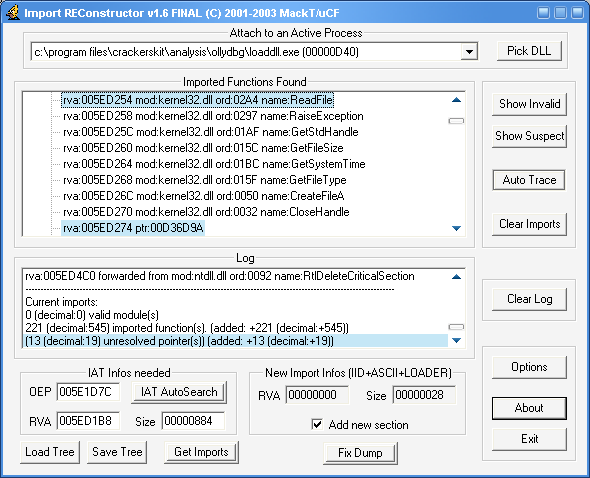
The OEP is 009E1D7C and the Imagebase is 00870000
Due to the limitations of Imprec we have to fiddle this part...
Subtract 00400000 NOT 00870000 from the OEP and we get the OEP Imprec needs.(005E1D7C)
(Do Not Press Get imports yet)
OEP 是 009E1D7C 镜象基址是 00870000
由于 Import REC 有局限性,我们必须欺骗这部分...
从 OEP 处减去 00400000 而不是 00870000 然后就得到了 Import REC 需要的 OEP (005E1D7C)
(还没按下 Get imports)
Now we need the RVA and Size of the IAT, to do this leave Imprec open then return to ollydbg and goto the top of the section (Press Home) then press Ctrl+B and enter the hex FF 25 and search, You should land on this line:
00871250 -FF25 70D29E00 JMP DWORD PTR DS:[9ED270] ; kernel32.CloseHandle
Now Right Click > Follow In Dump > Memory Address
To make it easier to view Right click in the dump and select Long > Address.
Now scroll up until you can see what looks to be the start of the IAT:
现在我们需要 IAT 的 RVA 和 Size,保留 Import REC 为打开状态,然后返回到 OD (按 Home 键)来到段顶 Ctrl+B 输入十六进制 FF 25 并 搜索。你会来到这行:
00871250 -FF25 70D29E00 JMP DWORD PTR DS:[9ED270] ; kernel32.CloseHandle
右键单击 > 数据窗口中跟随 > 内存地址
为了更方便地查看,在转存窗口右键单击选择 长型 > 地址
向上滚动你将看到 IAT 的起始地址
(Note down the address next to the pointer (009ED1B0 for us) as we need it later)
Now Scroll the opposite way until you find what looks like the end of the IAT:
记下 009ED1B0 ,一会我们会用到
现在向相反方向滚动直到找到 IAT 的结束地址:
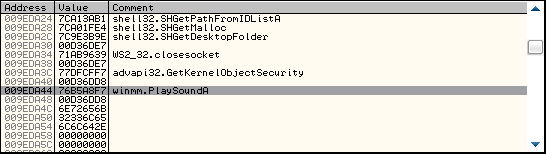
(Note down the address next to the pointer (009EDA44 for us) as we need it later)
So the RVA for the IAT is 009ED1B8 minus 00400000 = 005ED1B8
The Size of the IAT is 009ED1B8 - 009EDA44 = 884
Now enter this information into Imprec and click Get Imports (Not IAT AutoSearch):
记下 009EDA44,一会我们会用到
所以 IAT 的 RVA 是 009ED1B8 减去 00400000 = 005ED1B8
IAT 的 Size 是 009ED1B8 - 009EDA44 = 884
现在把这些信息输入到 Import REC 然后点 "获取输入表"(不是 自动搜索 IAT):
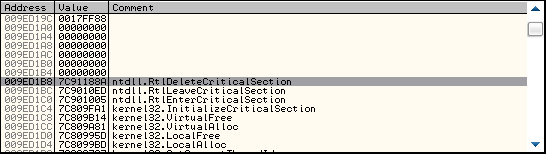
Click Show Invalid, then right click and Invalid pointer and choose Cut Thunks
点显示"无效函数",然后在无效指针上点右键选择”剪切指针“
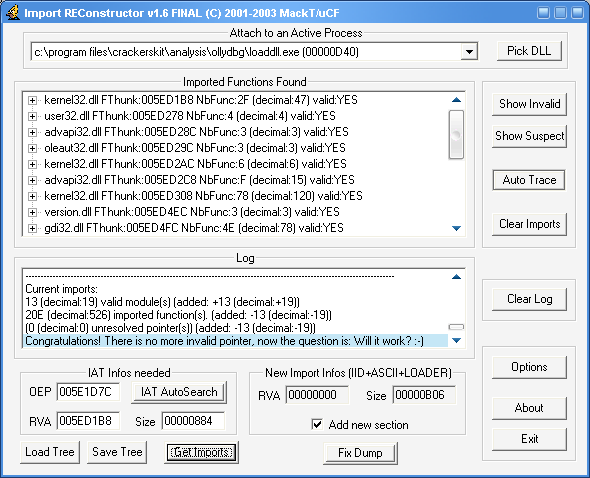
NOW WAIT! Before you go clicking Fix Dump we have a vital task left.
We need the real RVA for the OEP and IAT Start
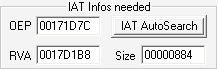
So the real OEP RVA is 009E1D7C minus 00870000 = 00171D7C
The real RVA for the IAT is 009ED1B8 minus 00870000 = 0017D1B8
So place those values into Imprec:
在修复抓取文件之前等一下,我们还有一个重要的任务
我们需要真正的 OEP 的 RVA 和 IAT 的起始
所以真正的 OEP RVA 是 009E1D7C - 00870000 = 00171D7C
真正的 IAT RVA 是 009ED1B8 - 00870000 = 0017D1B8
所以在 Import REC 中输入这些值
Now click Fix Dump and select the file you dumped with LordPE earlier.
Now lets just tidy up the DLL by loading the PE Editor in LordPE
Change the Imagebase to 00870000 and the BaseOfCode to 1000 then save it
现在点 "修复抓取文件" 并且用 LordPE 载入你前面转存的文件.
现在我们用 LordPE 的 PE Editor 来整理这个 DLL
修改镜像基址为 00870000 代码基址为 1000 然后保存
Usually this would be the end of unpacking the file (besides removing the unused sections).
But this app has some tricks which damage/invalidate the Relocation Table in some way.
Usually you simply change the address+size of the Relocation Table in Directory Information from .reloc1 to match .reloc
This doesnt work for this app so we must rebuild the Relocation table.
通常脱壳到这将要结束了(除删除一些无用的区段外)
但是这个程序的重定位表的某些方面有一些 损坏的/无效的 tricks
通常你可以简单的修改"目录"信息中的重定位表从 reloc1 去匹配 reloc 的地址和大小
但这样不能使这个程序运行,所以我们必须重建重定位表
Now place this DLL somewhere safe
现在把这个 DLL 放到一个安全的地方
We now need to have 2 almost identical dumps (Same OEP, Header, Good IAT) but with different imagebases at the time of dumping.
We already have one from above, but that was made using LoadDLL.
We need a dump from the actual target program aswell, in this case TibiaBot uses a loader to inject hook.dll into the active process Tibia.exe (The Game this was designed for).
So we much load Tibia.exe into OllyDBG and run it, then goto Debugging Options and Select Break on New Module
现在我们需要 2 个几乎一模一样的 Dump 文件(同样的 OEP,Header,正确的 IAT),但是转存的时候不能是相同的基址。
我们已经从上面得到了一个,但是她是用 LoadDLL 生成的.
我们需要一个最好从现行目标程序的 dump ,在这个案例中 TibiaBot 使用一个 loader 来注入 hook.dll 到一个激活的进程中 Tibia.exe (这是特意为这个游戏的).
所以我们必须载入 Tibia.exe 到 OD 并执行她,然后到 调试设置 > 事件 >中断于新模块 (DLL)
Once this is done run Loader.exe (The program that injects the DLL into the process) and now OllyDBG should break showing the DLL being loaded.
Next to it there is a column called Entry, this shows the entrypoint of the DLL > Go to it
Once there place a breakpoint on it and then remove Break on new modules.
Once it has broken at the entry point of the dll then you must follow all the steps from the beginning again until you have the 2 working dumps.
Remember to change the imagebase on the 2nd dumped dll to what it was in memory.
当这些完成后执行 Loader.exe (程序会把 DLL 注入到进程) 现在 OD 应该中断并显示 DLL 载入后的开始处
这有一列调用表,这些显示 DLL 的入口点 > 到那去
然后在那设置一个断点并且删除 "中断于新模块 (DLL)"
当中断在 DLL 的入口点后你必须再次重复前面所有的步骤直到你有了 2 个运行中的 dumps.
记住要修改两个 Dump 出的 DLL 文件的镜像基址为当时的内存基址
PLEASE NOTE that Armadillo can ignore breakpoints on some targets if the option was enabled, if this is the case then Press Ctrl+G and type the API name (i.e VirtualProtect) and place a normal breakpoint on the retn of that function instead of BP FUNCTION_NAME
请注意如果选项是钩选的 Armadillo 可以在一些目标上忽略断点,
如果发生这种情况可以按 Ctrl+G 并输入 API 名 (如:VirtualProtect),并在函数的 retn 处下一个普通的断点来代替 BP 函数名这种方式.
Once you have your 2 dll's then we need to use a wonderful tool called ReloX by Mackt.
Load both Dll's into the program:
当你有了 2 个 DLL 后,我们需要一个非常好的 Mackt 写的工具叫 ReloX
载入 2 个 DLL 到程序中
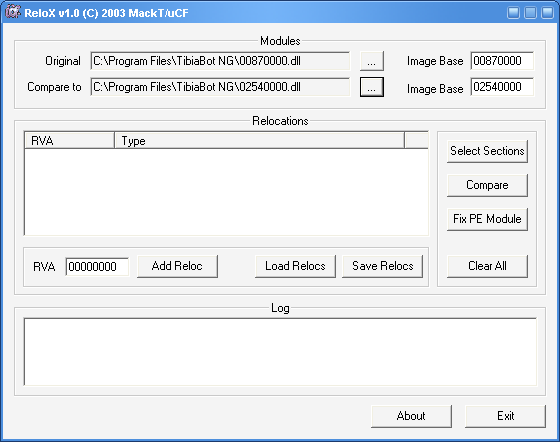
Click Select sections and remove the ticks from any sections that arent used for code or are part of Armadillo.
I only ticked:
CODE
DATA
.idata
.text
点 Select sections 并从所有的段中去掉不是代码所使用钩选或者是属于 Armadillo 的部分
我只钩选了:
CODE
DATA
.idata
.text
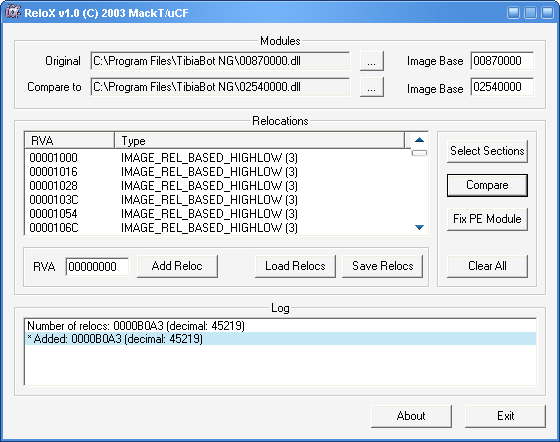
Once that is done click Compare:
完成后点击 Compare:
Now you can click Fix PE Module and choose the same dll you opened first in ReloX
(At the top of the screen aka Original).
现在你可以单击 Fix PE Module 并选择你用 ReloX 先打开的相同的 DLL
Now Test...
现在测试

Looks like its working fine!
看起来运行的还不错!
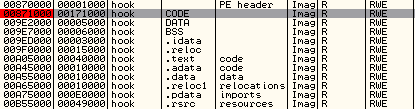
Last thing just for neatness you should remove all the unused sections from your file.
I have only these sections left:
最后一件事就是整理,你应该从你的文件中删除所有未使用的段
我仅剩下这些段:
CODE
DATA
.idata
.rsrc
.mackt
.reloc
Well Done!
You have successfully unpacked an Armadillo DLL!Greets
TeamICU, TSRh, SnD, FFF, SEC-8, MP2K, ARTeam, AHTeam, Revenge, {RES} and all other Teams!Written by: Whiterat //ICU
8th March 2006