ArmInline——Armadillo客户版Code Splicing+Import Table Elimination的简便修复方法
目标程序: Fraps V2.6.4
下载页面: http://www.skycn.com/soft/19754.html
软件大小: 650 KB
软件语言: 英文
软件类别: 国外软件 / 共享版 / 系统其它
应用平台: Windows2000/XP/2000
加入时间: 2005-08-16 09:16:56
下载次数: 17403
推荐等级: ****
软件介绍: 显卡辅助软件,用它可以轻松了解机器在运行游戏时的帧数,从而了解机器的性能!另外它还具备:测试软件:可以在屏幕角上看到每秒桢数。可以执行用户定义的测试和测量任意两点间的桢数。可以储存统计结果到磁盘并用以你自己对看法和应用程序中。抓屏软件:按一下键就可以抓屏。当你抓屏时不用再打开绘图程序。你的抓屏会被自动命名和加上时间标签。实时视频捕捉软件:可以在打游戏的时候捕捉视频。注:Fraps从2.0版开始变为商业版本且只能在2000/XP下运行。
【作者声明】:只是感兴趣,没有其他目的。失误之处敬请诸位大侠赐教
【调试环境】:WinXP、OllyDBD、PEiD、LordPE、ImportREC、ArmInline
—————————————————————————————————
【脱壳过程】:
前几天看到hacnho在exetools发的《Code Splicing+Rebase IAT: GameJack 5.0》教程,推荐的Armadillo脱壳辅助工具ArmInline很不错。找了Gamejack V5.0.4.1脱壳练习,Gamejack没有使用Import Table Elimination。
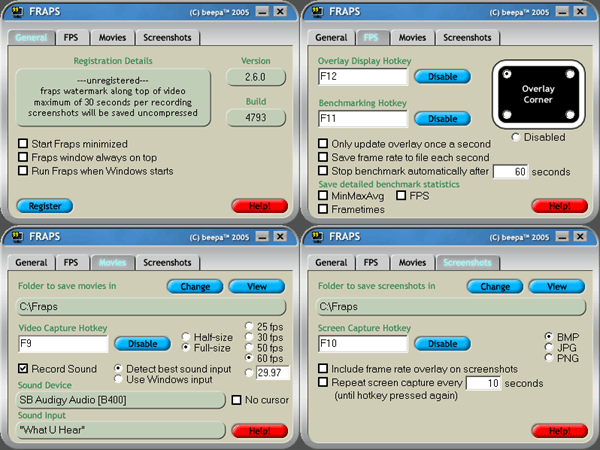
所以我找了Fraps V2.6.4来演示一下如何用ArmInline来使得Armadillo脱壳变得简单点。
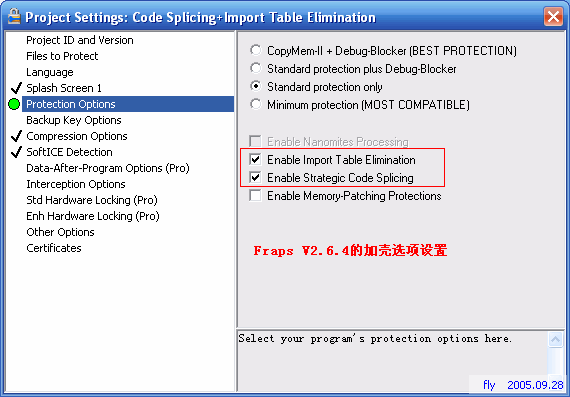
Fraps V2.6.4的加壳选项应该如下:
—————————————————————————————————
一、Armadillo客户版的功能
Armadillo的作者比较精明,公开试用的是Public Build,给注册用户的是Custom Build。
Custom Build提供了一些Public Build所限制的功能,这些功能就是Armadillo立于猛壳之林数年不败所依赖的精华了。
1、Nanomites Processing
The Nanomites provide additional protection against memory-dumping for your programs. They will protect your program even if it is somehow stripped out of the SoftwarePassport/Armadillo shell. If your program can use the Debugger-Blocker or CopyMem-II, it should be able to use Nanomites as well. Besides enabling this option, you must mark sections within your program where Nanomites are permitted to reside and won't cause any speed problems, and use a custom build of the Armadillo engine. This option can only be used with the Debugger-Blocker or CopyMem-II protections.
Nanomites Processing就是通常所谓的CC,Armadillo最让人头痛的保护措施。
2、Import Table Elimination
Import Table Elimination is another anti-dumping defense. It removes the import table of the program, making it much more difficult to reconstruct the unprotected program file. Unlike CopyMem-II and the Nanomites, this defense does not require the Debugger-Blocker, but it is only available in custom builds.
Import Table Elimination一般是把输入表放在壳申请的内存处并且乱序处理。
对于输入表乱序,以前有两种解法:①、写代码重新排序;②、直接用ImportRec“创建新的IAT”功能来构造新的输入表。
3、Code Splicing
Strategic Code Splicing is another anti-dumping defense. It removes portions of your code and places them randomly in memory, changing them so that they still operate the same but are coded differently. Unlike CopyMem-II and the Nanomites, this defense does not require the Debugger-Blocker, but it is only available in custom builds.
Code Splicing通常称为远程地址,Armadillo会把程序中的部分代码挪移到壳申请的内存段运行,普通dump会导致此部分代码丢失。以前有两种解法:①、修改VirtualAlloc返回地址,使其把挪移的代码放到无用的壳区段;②、Dmp后补上那个包含挪移代码的壳申请的内存段。
4、Memory-Patching Protections
He Memory-Patching Protections prevent an attacker from using a loader to change your program's code in memory, once it's loaded. If you handle any part of the expiration logic in your program's code, or use environment variables to control features that are only allowed in the paid-for version, then your program might be vulnerable to a memory-patching attack.
If you use this option, you MUST use either CopyMem-II or the monitoring thread (or both), or it won't be able to do anything.
The only time this option can cause a problem is if your program uses self-modifying code -- this option would consider that an attack, and would deliberately crash your program to stop it.
内存校验。
—————————————————————————————————
二、寻找Magic Jump返回的时机
设置OllyDBG忽略所有异常选项。用IsDebug插件去掉OllyDBG的调试器标志。
00E02433 55 push ebp
//载入OllyDBG后暂停在这
00E02434 8BEC mov ebp,esp
00E02436 6A FF push -1
00E02438 68 88C1E200 push 0E2C188
00E0243D 68 7021E000 push 0E02170
00E02442 64:A1 00000000 mov eax,dword ptr fs:[0]
00E02448 50 push eax
00E02449 64:8925 0000000>mov dword ptr fs:[0],esp
00E02450 83EC 58 sub esp,58
00E02453 53 push ebx
00E02454 56 push esi
00E02455 57 push edi
00E02456 8965 E8 mov dword ptr ss:[ebp-18],esp
00E02459 FF15 8851E200 call dword ptr ds:[E25188] ; kernel32.GetVersion
下断:HE GetModuleHandleA
Shift+F9,注意观察中断时的堆栈
0012967C 016130CE /CALL 到 GetModuleHandleA 来自 016130C8
00129680 01623D6C \pModule = "kernel32.dll"
00129684 01625D70 ASCII "VirtualAlloc"
0012967C 016130EB /CALL 到 GetModuleHandleA 来自 016130E5
00129680 01623D6C \pModule = "kernel32.dll"
00129684 01625D64 ASCII "VirtualFree"
0012941C 01605386 /CALL 到 GetModuleHandleA 来自 01605380
00129420 00129558 \pModule = "kernel32.dll"
当堆栈如上显示变化时就是返回修改Magic Jump的时机了!
经常有兄弟说找不到Magic Jump返回的时机,大部分Armadillo的Magic Jump返回的时机都可以用上面的方法来确定。
当然,某些老版本的Armadillo和这不同,可以去查阅《看雪论坛精华合集》。
HD GetModuleHandleA 取消断点
Alt+F9返回01605386
01605380 FF15 C8E06101 call dword ptr ds:[161E0C8] ; kernel32.GetModuleHandleA
01605386 8B0D 24CF6201 mov ecx,dword ptr ds:[162CF24]
//返回这里
0160538C 89040E mov dword ptr ds:[esi+ecx],eax
0160538F A1 24CF6201 mov eax,dword ptr ds:[162CF24]
01605394 393C06 cmp dword ptr ds:[esi+eax],edi
01605397 75 16 jnz short 016053AF
01605399 8D85 DCFEFFFF lea eax,dword ptr ss:[ebp-124]
0160539F 50 push eax
016053A0 FF15 90E06101 call dword ptr ds:[161E090] ; kernel32.LoadLibraryA
016053A6 8B0D 24CF6201 mov ecx,dword ptr ds:[162CF24]
016053AC 89040E mov dword ptr ds:[esi+ecx],eax
016053AF A1 24CF6201 mov eax,dword ptr ds:[162CF24]
016053B4 393C06 cmp dword ptr ds:[esi+eax],edi
016053B7 0F84 2F010000 je 016054EC
//Magic Jump! 修改为:jmp 016054EC ★
016053BD 33C9 xor ecx,ecx
016053BF 8B03 mov eax,dword ptr ds:[ebx]
016053C1 3938 cmp dword ptr ds:[eax],edi
016053C3 74 06 je short 016053CB
016053C5 41 inc ecx
016053C6 83C0 0C add eax,0C
016053C9 EB F6 jmp short 016053C1
—————————————————————————————————
三、OEP:飞向光明之巅
下断:BP GetCurrentThreadId [ESP]<10000000
也可以使用Second段内存断点大法走至OEP啦。
Shift+F9 运行,中断在GetCurrentThreadId处,堆栈:
0012F71C 0160571D CALL 到 GetCurrentThreadId 来自 01605717
取消这个断点。Alt+F9 返回,Ctrl+S 在当前位置下搜索命令序列:
call ecx
mov dword ptr ss:[ebp-4],eax
找到在0161980E处,下断。Shift+F9 运行,中断下来
0161980C 2BCA sub ecx,edx
0161980E FFD1 call ecx ; fraps.0040C434
//飞向光明之巅
01619810 8945 FC mov dword ptr ss:[ebp-4],eax
01619813 8B45 FC mov eax,dword ptr ss:[ebp-4]
01619816 5F pop edi
01619817 5E pop esi
01619818 C9 leave
01619819 C3 retn
0040C434 55 push ebp
//OEP
0040C435 8BEC mov ebp,esp
0040C437 6A FF push -1
0040C439 68 28334100 push 413328
0040C43E 68 30E94000 push 40E930
0040C443 64:A1 00000000 mov eax,dword ptr fs:[0]
0040C449 50 push eax
0040C44A 64:8925 0000000>mov dword ptr fs:[0],esp
0040C451 83EC 58 sub esp,58
0040C454 53 push ebx
0040C455 56 push esi
0040C456 57 push edi
0040C457 8965 E8 mov dword ptr ss:[ebp-18],esp
0040C45A FF15 50407401 call dword ptr ds:[1744050] ; kernel32.GetVersion
—————————————————————————————————
四、Code Splicing修复
Fraps使用了远程地址和输入表乱序。
现在该ArmInline登场了,使用ArmInline需要设定一些参数。感谢CoDe_Inject的帮忙。
注意:下面的地址表示都是使用Virtual Address
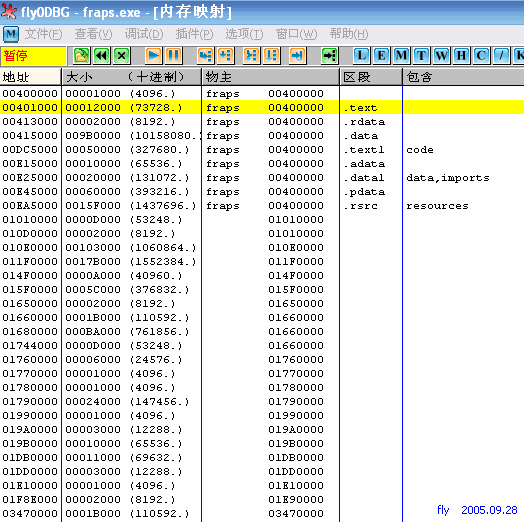
Alt+M打开内存察看窗口,记下fraps.exe进程的数据。
1、Process ID
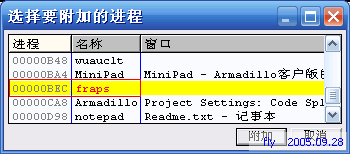
OllyDBG菜单->文件->附加,显示当前的进程列表,找到目标进程的ID即可。
2、Start Of Target Code
代码段的开始地址,一般为第2个区段,这里是00401000
3、Length Of Target Code
第2区段的Size,这里为00012000
4、Start Of Spliced Code
在程序中查找Code Splicing的地方。
0040C53C E8 00250000 call 0040EA41
0040C541 E9 4A9E0603 jmp 03476390
//处理Code Splicing
此区段的开始地址=03470000
5、Length Of Spliced Code
直接察看03470000段的Size=0001B000
下面在ArmInline填入各项数据,点击“Remove Splice”,可以看到“Patch Succesful”的提示。
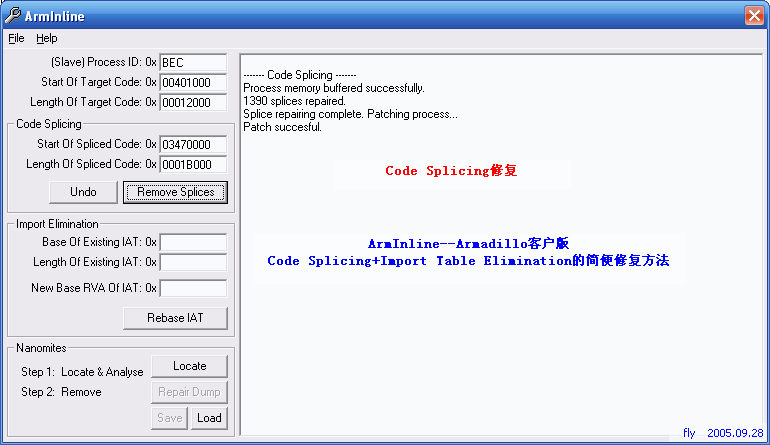
如果失败,请检查各数据信息。当然,某些时候修复可能会有问题。
—————————————————————————————————
五、Import Table Elimination修复
1、Base Of Existing IAT
现在输入表函数的开始地址。
在程序中随便找个API调用,在数据窗口中察看IAT的开始和结束地址。
可以在数据窗口中选择方便的察看方式,点右键->长型->地址
Base Of Existing IAT=IAT Start=0174400C
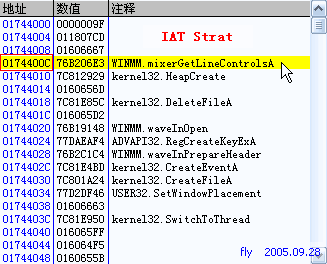
2、Length Of Existing IAT
IAT的大小。向下滚动窗口,可以看到结束的地方。
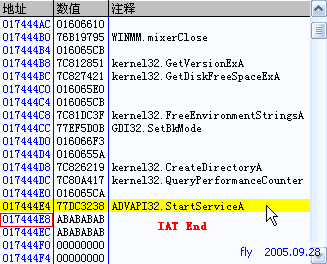
IAT End=017444E8
Length Of Existing IAT=Size=017444E8-0174400C=4DC
3、New Base RVA Of IAT
新输入表的存放地址。ArmInline会把乱序的输入表重新整理成有序的,方便ImportREC修复。
在程序中找段足够的空白处就行了。
我通常是存放在程序加壳前原来IAT的相近地方。如何查找这个地方?
Armadillo加壳时保留了原输入表的DLL名,利用这个特征就行了。
Alt+M,在第2个区段开始搜索输入表中的某个DLL名,去掉“整个段块”的选项,如kernel32.dll
找到在00413E1A处,向上看到还有许多的0000,那就放在00413B10处吧。
在ArmInline填入以上数据,点击“Rebase IAT”,可以看到提示修复成功了。
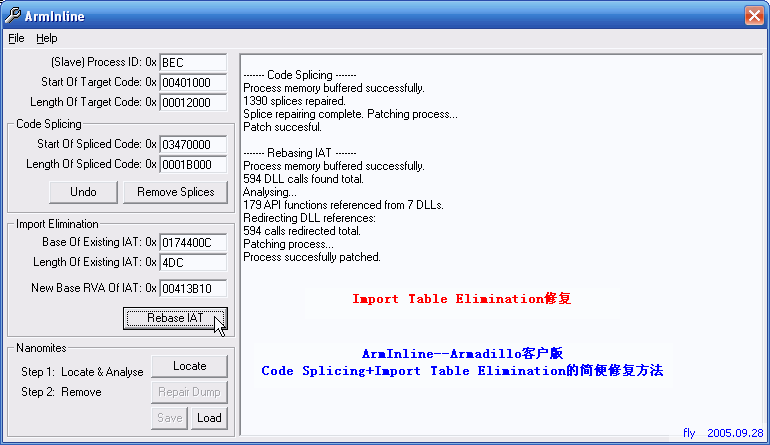
ArmInline V0.6支持Nanomites修复了,有兴趣的兄弟测试看看。
—————————————————————————————————
六、Armadillo保护程序脱壳后PE的修复和优化
现在去代码窗口中可以看到Code Splicing的地方还原了,输入表也放在了程序内部。
运行LordPE修正ImageSize后完全Dump这个进程。得到dumped.exe
运行ImportREC,把OEP改为0000C434,点IAT AutoSearch、Get Import,可以得到整齐的输入表。
但是此时修复的话,ImportREC会提示“没有足够的空间!不能对抓取文件添加任何区块!”。

为何这样?当然是Armadillo惹的祸。用WinHex打开dumped.exe,检查其PE信息。
0X3C处是e_lfanew,所指向的偏移是PE Header。dumped.exe的e_lfanew=00A65CEF
Armadillo把PE Header复制到了壳区段里,PE Header后面是壳代码,导致了ImportREC无法增加区段。
我们把00A65CEF-00A65F26处的PE Header复制写入到0XF0的原PE Header处,修正e_lfanew=000000F0
现在就可以用ImportREC“新增区段”来修复输入表了。
不过修复Import Table Elimination后00413B10后面还有不少空地,算算Size够了,所以我没有“新增区段”,而是放在0X00013E00处,这样稍微美观点,也减小了文件的长度。得到UnPacKed.exe
注意:输入表中的ntdll.dll要替换成kernel32.dll的相应函数,否则无法跨平台运行。
再来谈谈Armadillo保护程序脱壳后的优化问题。
用LordPE打开UnPacKed.exe的区段,记下.text1区段的ROffset=009C5000。Wipe Section Header末尾的几个壳区段:.text1、.adata、.data1、.pdata、.rsrc,用WinHex删除自009C5000至末尾的数据,用00清掉Section Table里面的这5个区段信息。

壳区段清理完了,脱壳文件由12M变为9.76M,但是第3个.data段RawSize=009AF618,明显太大,用WinHex察看0X17000后全是00,所以删除自00017000至末尾的00,修正.data段RawSize=00002000,VirtualSize=009AF618保持不变,否则程序会出错。
别忘了资源段。刚才我们删除区段是把资源段也删了,当然不能没有资源段啦。
用ResFixer或者DT_FixRes来修复资源吧。
运行ResFixer打开未优化的dumped.exe,看到各资源项都是完好的,如果有问题ResFixer会以红色来显示,我们所要做的是把Resource的RVA调整一下,在Section RVA填入009C5000(00015000+009AF618=009C4618,取整=009C5000),File Alignment一般是00001000,Rebuild Method选择Method 1(Cut And Paste),点击“Rebuild”,得到.rsrc文件。
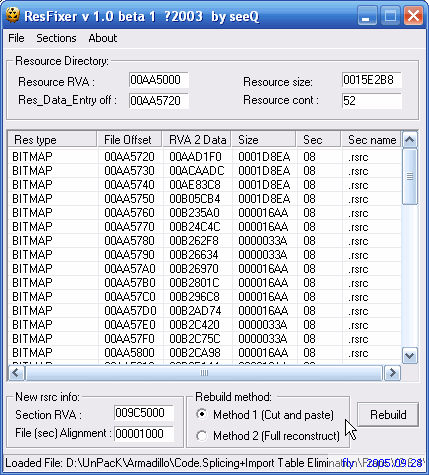
ResFixer的两种修复方法要注意一下。如果壳挪动了资源项,则需要选择Method 2(Full Reconstruct)来Rebuild。如果只是调整Resource RVA,选择Method 1(Cut And Paste)即可。另外ResFixer有bug,修复某些程序资源时会异常出错。
使用DT_FixRes最终版修复的设置如下:
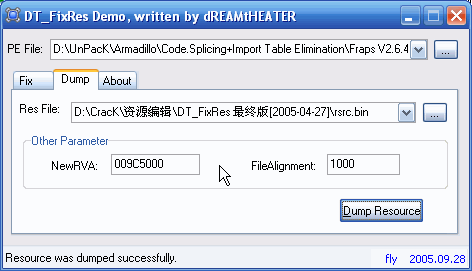
运行LordPE把.rsrc文件load入UnPacKed.exe,修正Resource RVA=009C5000
OK,UnPacKed.exe大小为1.46M,脱壳完成。
此时用PEiD侦壳脱壳文件会显示“Armadillo 1.xx-2.xx”,用WinHex把PE Header+0X1A、0X1B处MajorLinkerVersion、MinorLinkerVersion的5352清0就行了。
终于整理好了,希望能对朋友们有点用处。
Game Over
—————————————————————————————————
, _/
/| _.-~/ \_ , 青春都一晌
( /~ / \~-._ |\
`\\ _/ \ ~\ ) 忍把浮名
_-~~~-.) )__/;;,. \_ //'
/'_,\ --~ \ ~~~- ,;;\___( (.-~~~-. 换了脱壳轻狂
`~ _( ,_..--\ ( ,;'' / ~-- /._`\
/~~//' /' `~\ ) /--.._, )_ `~
" `~" " `" /~'`\ `\\~~\
" " "~' ""
UnPacKed By : fly
2005-09-28 20:00